OpenCPI Ettus E31X Getting Started Guide
This document provides installation information that is specific to the Ettus Research™ E310 Universal Software Radio Peripheral (USRP™). Use this document when performing the tasks described in the chapter “Enabling OpenCPI Development for Embedded Systems” in the OpenCPI Installation Guide. This document supplies details about enabling OpenCPI development on the E310 USRP that can be applied to the procedures described in the referenced OpenCPI Installation Guide chapter.
The following documents can also be used as reference to the tasks described in this document:
Note that the OpenCPI Glossary is also contained in both the OpenCPI Installation Guide and the OpenCPI User Guide.
This document assumes a basic understanding of the Linux command line (or “shell”) environment.
Document Revision History
OpenCPI Version |
Description of Change |
Date |
|---|---|---|
v1.3.1-E3XX |
Initial Release |
3/2018 |
v1.4 |
Updated for Release |
9/2018 |
v1.5 |
Add setup of udev file |
4/2019 |
v1.6 |
Refer to Installation Guide where possible |
1/2020 |
v2.2 |
Convert to RST, update to xilinx19_2_aarch32, remove boot artifacts appendix |
6/2021 |
v2.4 |
Update to xilinx24_1_aarch32 |
2/2025 |
Overview
The E310 is a device in the “Universal Software Radio Peripheral (USRP) Embedded Series” of devices from Ettus Research, along with the E312, USRP E313, and USRP E320. See the Ettus Research USRP Embedded Series product brief for information about the series.
The Ettus Research documentation uses the notation “E3xx” to refer to this series. See the E3xx Series section of the vendor manual for details about the devices in the series.
The OpenCPI HDL (FPGA) platform for the E310 is called
the “e31x” because the E310, E312, and E313 USRPs all have
the same circuits and parts.
OpenCPI has been tested on the E310 USRP.
Table 2: lists the items in the E3XX product package and their function in setting up the E310 for OpenCPI installation and deployment.
Item |
Used for… |
|---|---|
E310 USRP |
OpenCPI target embedded system |
Power supply |
Power source for E310 |
1 Gigabit Ethernet cable |
Setting Up the E310 for OpenCPI Network-Mode Operation (Optional) |
Micro-USB-to-USB cable |
|
Standard SD card (8GB or larger) |
Setting up the SD Card for the E310 (Contents not used for OpenCPI installation/deployment) |
SMB-to-SMA adapters (2) |
Not used for OpenCPI installation/deployment |
Getting started guide |
General information about E310. Do not use chapters 5, 11, 12 |
Note
When using the E310 with OpenCPI, do not perform the steps described in the Ettus Research Getting Started Guide chapters listed below. These steps are not necessary for OpenCPI installation and deployment on the E310 USRP and may conflict with OpenCPI installation and deployment:
5, “Install and Setup the Software Tools on Your Host Computer”
11, “Example Programs”
12, “Test and Verify the Options of the USRP”
Enabling OpenCPI Development for the E310 USRP
This section gives information about the E310 USRP to use when following the instructions in the chapter “Enabling OpenCPI Development for Embedded Systems” of the OpenCPI Installation Guide.
Note
The instructions in the next sections assume that the basic OpenCPI installation for the development host has already been done. If it has not, follow the instructions in the chapter “Installing OpenCPI on Development Hosts” of the OpenCPI Installation Guide before proceeding to follow the instructions in these sections.
Installation Steps for the E310 Platform
This section contains information to be applied to the tasks described in the section “Installation Steps for Platforms” of the OpenCPI Installation Guide.
Supported OpenCPI Platforms and Vendor Tools
Table 3: lists the OpenCPI software (RCC) and hardware (HDL (FPGA) platforms used for the E310 USRP and the third-party/vendor tools on which they depend.
OpenCPI Platform Name |
Description |
OpenCPI Project/Repo |
Required Third-Party/ Vendor Tools |
|---|---|---|---|
|
Xilinx Linux from 2024Q1 (2024.1) for Zynq-7000 |
built-in |
Xilinx Vitis™ SDK 2024.1 Xilinx Binary Zynq Release 2024.1 Xilinx Header 2024.1 aarch32 |
|
Ettus E31X Zynq FPGA/PL |
|
Xilinx Vivado® WebPACK |
Notes about the OpenCPI platforms listed in the table:
xilinx24_1_aarch32is the primary RCC platform for the E310 USRP.The
xilinx24_1_aarch32RCC platform is configured for DHCP.The
e31xHDL platform supports the E310, E312, and E313 USRPs. It does not support the E320 USRP.The OSP for the
e31xHDL platform is named E3XX to plan for possible future support of other devices in the E3XX series.
Installing the Vendor Tools for the OpenCPI Platforms
Follow the instructions in the section “Installing Xilinx Tools” in the chapter “Installing Third-party/Vendor Tools” in the OpenCPI Installation Guide to install the Xilinx tools listed as platform dependencies in Table 3:.
Note
Perform this step first, before installing/building the OpenCPI platforms for the E310.
Note
The e31x system requires the Xilinx Binary Zynq Release 2024.1 (see Table 3:).
Download the OpenCPI Xilinx OSP for the e31x using the following link: Prebuilt SD Card Artifacts
This package is to be placed in the /tools/Xilinx/ZynqReleases/2024.1/ (or /opt/Xilinx/ZynqReleases/2024.1/)
directory instead of downloading it from the Xilinx website as described in the
section “Xilinx Binary Releases for Zynq-7000 and Zynq-Ultrascale Systems” in the OpenCPI Installation Guide.
Download the OpenCPI Xilinx RCC Platform Kernel Headers using the following link: 2024.1 Kernel Headers
place the kernel headers package in /tools/Xilinx/ZynqHeaders/2024.1/ (or /opt/Xilinx/ZynqReleases/2024.1/)
Installing and Building the OpenCPI Platforms for the E310
After installing the required vendor tools, follow the instructions
in the section “Installation Steps for Platforms” in the
OpenCPI Installation Guide
to install and build the xilinx24_1_aarch32 and e31x platforms for the E310 USRP.
Both these platforms must be installed and built with ocpiadmin install platform
before proceeding to set up the SD card for the E310. For example:
ocpiadmin install platform xilinx24_1_aarch32

ocpiadmin install platform e31x
See the ocpiadmin(1) man page for command usage details.
Using the --minimal install option is recommended for most users.
After installing the e31x platform, the platform’s proxy workers must be
built for the xilinx24_1_aarch32 platform:
cd $OCPI_ROOT_DIR/projects/osps/ocpi.osp.e3xx
ocpidev build --rcc-platform xilinx24_1_aarch32
Note
The xilinx24_1_aarch32 platform is also used by other systems, such as the
Avnet (Digilent) ZedBoard (in OpenCPI, the zed and zed_ise HDL platforms).
If the xilinx24_1_aarch32 platform has already been installed and built
for another supported system, it can apply to the E310 USRP and does not need to be installed and built.
Building the platforms results in a single executable FPGA
test application named bias that is ready to run. It can be used to verify
the installation and any assemblies of the E3XX OSP itself. The bias
test application is based on the testbias HDL assembly.
Both bias and testbias reside in the ocpi.assets built-in project.
Installation Steps for the E310 After Its Platforms Have Been Installed
This section contains information to be applied to the tasks described in the section “Installation Steps for Systems after their Platforms are Installed” in the OpenCPI Installation Guide.
Setting Up the E310 for OpenCPI Network-Mode Operation (Optional)
OpenCPI allows three modes of operation on embedded systems: network mode, standalone mode, and server mode (see the beginning paragraphs in the section “Installation Steps for Systems after their Platforms are Installed” of the OpenCPI Installation Guide for details).
Using network mode for OpenCPI on the E310 USRP requires establishing an Ethernet connection from the E310 USRP to a network that supports DHCP.
There is one Ethernet port located on the E310 USRP’s rear panel, as shown in Figure 1:. Use the 1-Gigabit Ethernet cable provided in the E3XX product package to connect this port to the DHCP-supported network.
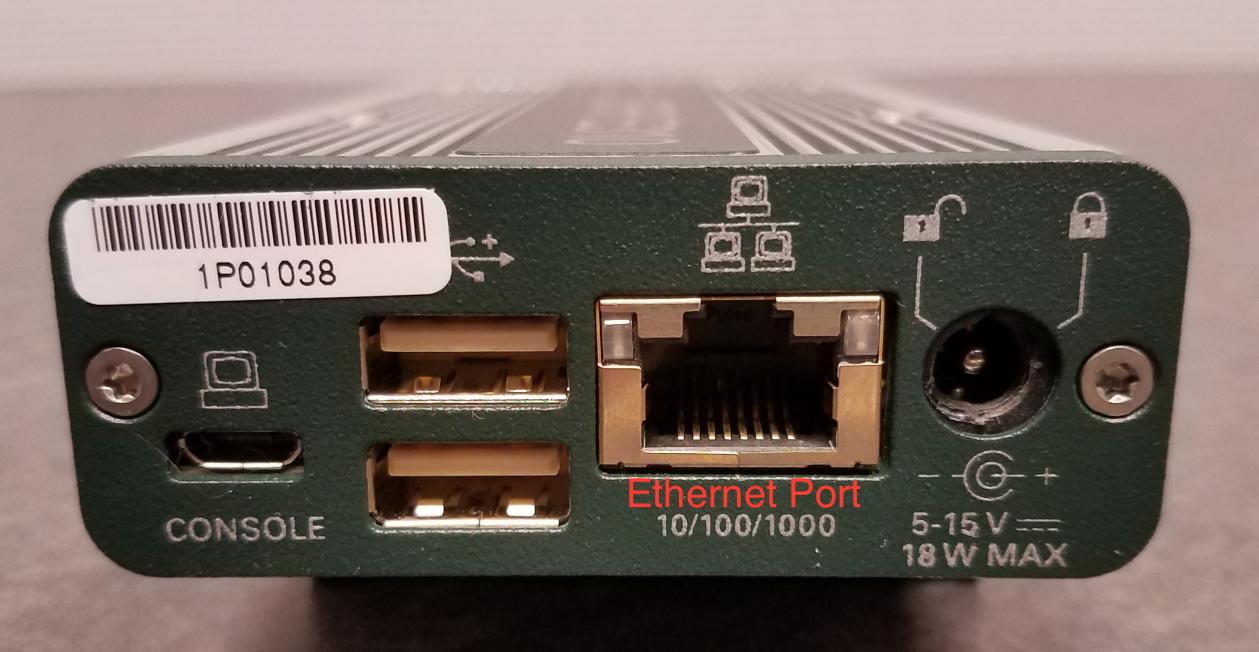
Figure 1: Ettus E310 USRP: Rear Panel Showing Ethernet Port
Setting up the SD Card for the E310
The E310 USRP boots from an SD card. Enabling OpenCPI on the E310 USRP requires creating a bootable SD card that replaces the factory SD card supplied with the E3XX product package.
Follow the instructions in the subsections “Preparing the SD Card Contents” and “Writing the SD Card” in the section “Installation Steps for Systems After Their Platforms are Installed” of the OpenCPI Installation Guide to create a bootable SD card that enables the E310 for OpenCPI.
Note
The recommended method described in the OpenCPI Installation Guide is to make a raw copy of the manufacturer-supplied card to a new card, preserving the manufacturer’s formatting and content, and then remove the original files from the raw copy and copy the files from OpenCPI.
For the E310, be sure to remove all the original contents from the raw copy you create from the factory SD card. OpenCPI provides all of the necessary files for installation and deployment on the E310, and the presence of any factory-supplied contents can cause problems with this process.
Should you need to format an SD card for the E310 USRP, it should be a single FAT32 partition.
The bootable SD card slot is located on the E310 USRP’s front panel. To eject an SD card, gently push it in and then release it.
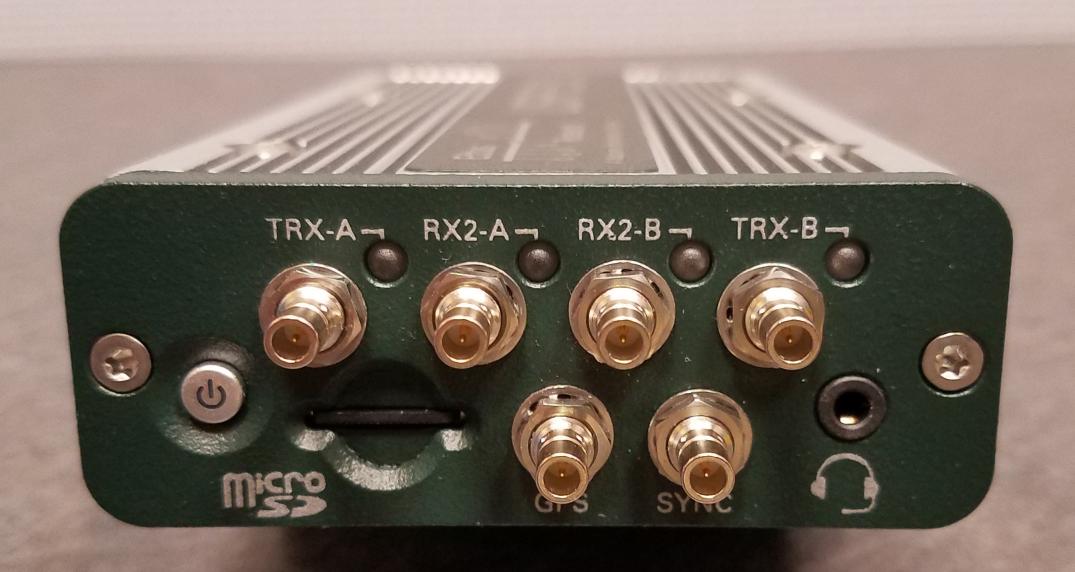
Figure 2: Ettus E310 USRP: Front Panel with SD Card Slot
Note
The E310 USRP front panel provides six SMB (50 Ohm) connectors labeled TRX-A, RX2-A, RX2-B, TRX-B, GPS, and SYNC. These connectors are not relevant to enabling OpenCPI on the E310. See the Ettus Research USRP Hardware Driver and USRP Manual for details about their function.
Establishing a Serial Console Connection for the E310
Follow the instructions in the section “Establishing a Serial Console Connection” in the OpenCPI Installation Guide to set up a serial console connection between the E310 and the development host.
On the E310 USRP, the micro-USB serial port is located on the system’s rear panel (see Figure 3:) and is labeled CONSOLE. Connect the micro-USB to USB-A cable supplied in the product package from this port to the development host.
The USRP E310’s console serial port operates at 115200 baud.
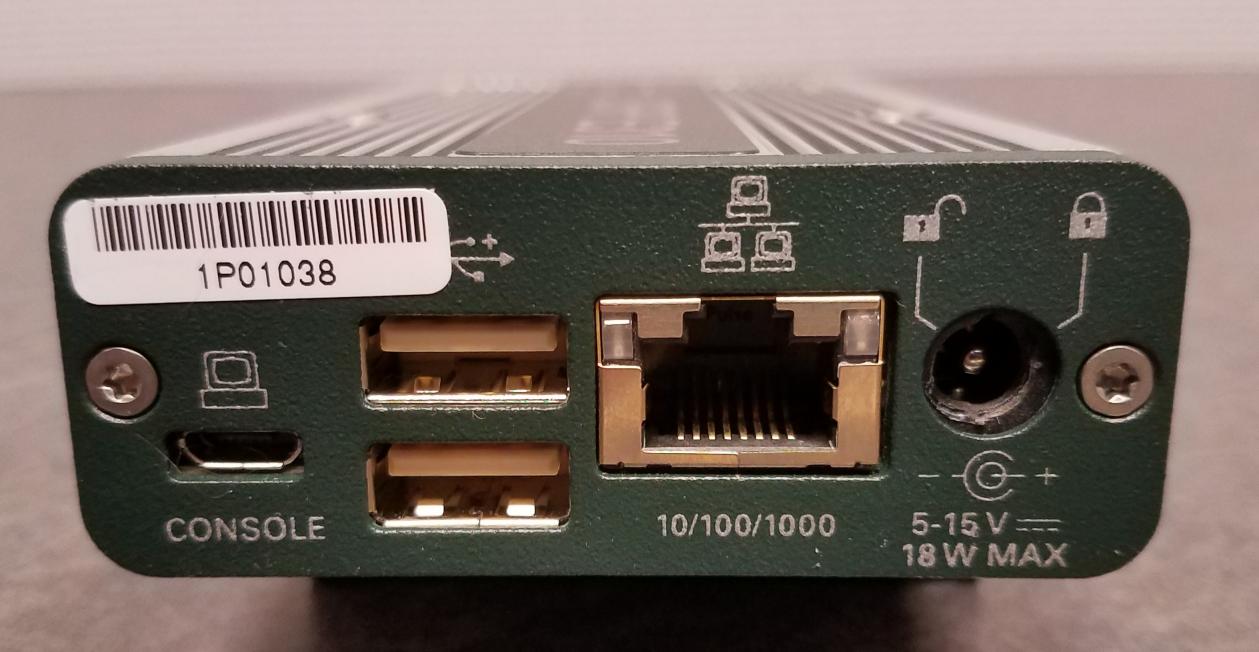
Figure 3: Ettus E310 USRP: Rear Panel with Serial Console Port
Configuring the Runtime Environment on the e31x Platform
Follow the instructions in the section “Configuring the Runtime Environment on the Embedded System” in the OpenCPI Installation Guide.
The E310 USRP is initially set with root for user name and password.
Running an Application
Reference Application
Once you have successfully set up OpenCPI and the E310, you can run
the FSK Digital Radio Controller reference
application, which is located in
projects/osps/ocpi.osp.e3xx/applications/fsk_dig_radio_ctrlr.
Documentation for this reference application is currently unavailable.
Using the E310 with the DRC and Timed Sample Protocol Components
The cfg_1rx_1tx_mode_2_cmos_csts platform configuration exposes the ADC and
DAC of the E310 via the Complex Short Timed Sample protocol. Timed Sample
protocols are used by components in the ocpi.comp.sdr project.
When using this configuration a typical container for the platform is shown below.
<HdlContainer config="cfg_1rx_1tx_mode_2_cmos_csts" only="e31x">
   <Connection external="adc_out_asm_in" device="data_src_qadc_csts0" port="out"
               card="e31x_mimo_xcvr_scdcd_csts"/>
   <Connection external="asm_out_dac_in" device="data_sink_qdac_csts0" port="in"
               card="e31x_mimo_xcvr_scdcd_csts"/>
</HdlContainer>
Connections between the E310’s FPGA and its ARM processor can be added to the container using:
<Connection external="<Connection_name>" interconnect="zynq"/>
By default the transmitter on the E310 will remain on whenever the channel is enabled in the DRC. When the transmitter is enabled the E310 has significant local oscillator (LO) leakage out of its transmit port. This can cause issues in time division multiple access (TDMA) applications. In these cases the OSP can allow the transmitter LO to be turned on and off using signaling inline with the transmit I/Q data. To enable this mode the following line must be added to the container:
<Connection device="data_sink_qdac_csts0" port="on_off"
            otherdevice="data_sink_qdac_csts_ad9361_sub" otherport="on_off0"
            card="e31x_mimo_xcvr_scdcd_csts"/>
When this connection is present the transmitter LO will be enabled when a
Start of message (SOM) is received by the DAC device workers, and disabled
when a flush opcode is received by the DAC device workers.
A typical assembly when using the above container is shown below.
<HdlAssembly>
  <Instance Worker="<EXAMPLE_TX_WORKER>" />
  <Connection Name="asm_out_dac_in" External="producer">
    <Port Instance="<EXAMPLE_TX_WORKER>" Name="output"/>
  </Connection>
  <Instance Worker="<EXAMPLE_RX_WORKER>" />
  <Connection Name="adc_out_asm_in" External="consumer">
    <Port Instance="<EXAMPLE_RX_WORKER>" Name="input"/>
  </Connection>
</HdlAssembly>
A typical application for the above assembly is shown below.
<Application>
  <Instance Component="ocpi.platform.drc">
    <property name='configurations'
              Value="{description first,
                      channels {{rx true,
                                 tuning_freq_MHz 2450,
                                 bandwidth_3dB_MHz 4,
                                 sampling_rate_Msps 4,
                                 samples_are_complex true,
                                 gain_mode auto,
                                 tolerance_tuning_freq_MHz 0.01,
                                 tolerance_sampling_rate_Msps 0.01,
                                 tolerance_gain_dB 1},
                                {rx false,
                                 tuning_freq_MHz 2450,
                                 bandwidth_3dB_MHz 4,
                                 sampling_rate_Msps 4,
                                 samples_are_complex true,
                                 gain_mode manual,gain_dB -30,
                                 tolerance_bandwidth_3dB_MHz 0,
                                 tolerance_tuning_freq_MHz 0.01,
                                 tolerance_sampling_rate_Msps 0.01,
                                 tolerance_gain_dB 1}}}"/>
    <property name='start' value='0'/>
    <property name="enable_rx_resampling" value="false" />
    <property name="enable_tx_resampling" value="false" />
    <property name="enable_rx_digital_tuning" value="false" />
    <!-- Set tx_disable_on_flush to true when on_off connection made in container -->
    <property name="tx_disable_on_flush" value="false" />
  </Instance>

  <Instance Component="<EXAMPLE_TX_COMPONENT>" Connect="drc" from="output" to="tx"/>
  <Instance Component="<EXAMPLE_RX_COMPONENT>"/>

  <Connection>
    <Port Instance="drc" Name="rx"/>
    <Port Instance="<EXAMPLE_RX_COMPONENT>" Name="input"/>
  </Connection>
</Application>
Known Issues
When using the
cfg_1rx_1tx_mode_2_cmos_cstsplatform configuration the maximum value for sampling_rate_Msps is 30.72 MHz.Support for the E310 GPIO header is not currently available in the OSP.