OpenCPI Avnet MicroZed 7Z010 Getting Started Guide
This document provides installation information that is specific
to the OpenCPI Avnet® MicroZed™ embedded system when it includes
the microzed_10_cc OpenCPI HDL (FPGA) platform. This platform
consists of the Avnet MicroZed 7Z010 System On Module (SOM) and the
Avnet MicroZed FMC (FPGA Mezzanine Card) Carrier Card (MZCC) on which the 7Z010 is required to be installed.
Use this document when configuring the MicroZed hardware for OpenCPI and when performing the tasks described in the chapter “Enabling OpenCPI Development for Embedded Systems” in the OpenCPI Installation Guide. This document supplies details about enabling OpenCPI development on the MicroZed 7Z010 that can be applied to the procedures described in the referenced OpenCPI Installation Guide chapter. The recommended method is to have the OpenCPI Installation Guide and this document open in separate windows and refer to this document for any platform-specific details while following the OpenCPI setup tasks described in the Installation Guide.
The following documents can also be used as references for the tasks described in this document:
Note that the OpenCPI Glossary is also contained in both the OpenCPI Installation Guide and the OpenCPI User Guide.
This document assumes a basic understanding of the Linux command line (or “shell”) environment.
Document Revision History
OpenCPI Version |
Description of Change |
Date |
|---|---|---|
v2.1 |
Initial Release |
4/2021 |
v2.4 |
Convert to RST, update for release |
5/2022 |
Overview
The Avnet MicroZed 7Z010 is a member of a family of pin-compatible SOMs based on the Xilinx® Zynq®-7000 All Programmable (AP) SoC. See the Avnet MicroZed product brief for information about the MicroZed board family and its variants.
The OpenCPI MicroZed system is designed to support FMC daughtercards.
To achieve this support, the 7Z010 SOM must be installed on an Avnet MZCC, which
provides a FMC low pin count (LPC) connector slot for FMC daughtercard connection.
In this configuration, the MZCC powers, connects, and operates the MicroZed 7Z010 SOM.
See the Avnet MZCC product brief
for details about the MZCC. In OpenCPI, the 7Z010 SOM-MZCC configuration is called the microzed_10_cc HDL platform.
Note
MZCC features that are additional to the FMC LPC slot, such as Digilent Pmods™, pushbuttons, and other peripheral interfaces, are not currently supported for use with OpenCPI.
Note
When FMC daughtercards are not required, the 7Z010 SOM can be used as a standalone hardware accelerator without requiring an MZCC. The 7Z010 SOM provides an Ethernet port, micro-USB port and microSD card slot and is powered by its micro-USB port. This document describes how to set up OpenCPI when both 7Z010 and MZCC are present in the hardware configuration.
Installation Prerequisites
The following items are required for OpenCPI MicroZed system installation and setup:
Avnet MicroZed 7Z010
Avnet MZCC
12V @5A power supply for the MZCC
micro-USB to USB-A cable
micro-USB to female-USB adapter
microSD card. Use the microSD card that comes with the product kit or provide a different microSD card. OpenCPI MicroZed setup has been tested using a 16GB microSD card.
These items are typically provided with the MicroZed 7Z010 and/or MZCC product kits.
Note
Ignore any quick start cards or instructions that come with the product kit. This getting started guide and the OpenCPI Installation Guide provide the necessary instructions for setting up the MicroZed system for OpenCPI.
The following items are optional:
1-Gigabit Ethernet cable
Analog Devices FMCOMMS2 or FMCOMMS3 daughtercard
Installation Summary
To set up the MicroZed system for OpenCPI development, perform the following steps:
Configure the MicroZed SOM and MZCC expansion board for use with OpenCPI and connect the two boards. See Setting up the MicroZed Hardware.
(Optional) Connect an FMCOMMS2 or FMCOMMS3 daughtercard to the MZCC. See Setting up the MicroZed Hardware.
Install OpenCPI on the development host. See Enabling OpenCPI Development for the MicroZed.
Prepare the development host to support the MicroZed system:
Connect a serial cable from the development host to the Picozed. See Establishing a Serial Console Connection for the MicroZed.
Connect an SD card reader/writer to the development host. See Setting up the SD Card for the MicroZed.
(Optional) Connect the MicroZed system to a DHCP-supported network. See Connecting the MicroZed to a DHCP-Supported Network (Optional).
Install the required vendor tools. See Installing the Vendor Tools for the OpenCPI Platforms.
Build the software and hardware platforms for the MicroZed system. See Installing and Building the OpenCPI Platforms for the MicroZed.
Prepare and write the bootable SD card for the MicroZed system. See Setting up the SD Card for the MicroZed.
Boot the MicroZed system and establish the OpenCPI environment on the system. See Configuring the Runtime Environment on the MicroZed.
Run the OpenCPI-provided test application to confirm successful installation. See Running the Test Application on the MicroZed.
Setting up the MicroZed Hardware
This section describes how to set up the boards in a MicroZed embedded system for OpenCPI. The locations of the target jumpers on the MicroZed 7Z010 SOM and MZCC are highlighted in Figure 1:
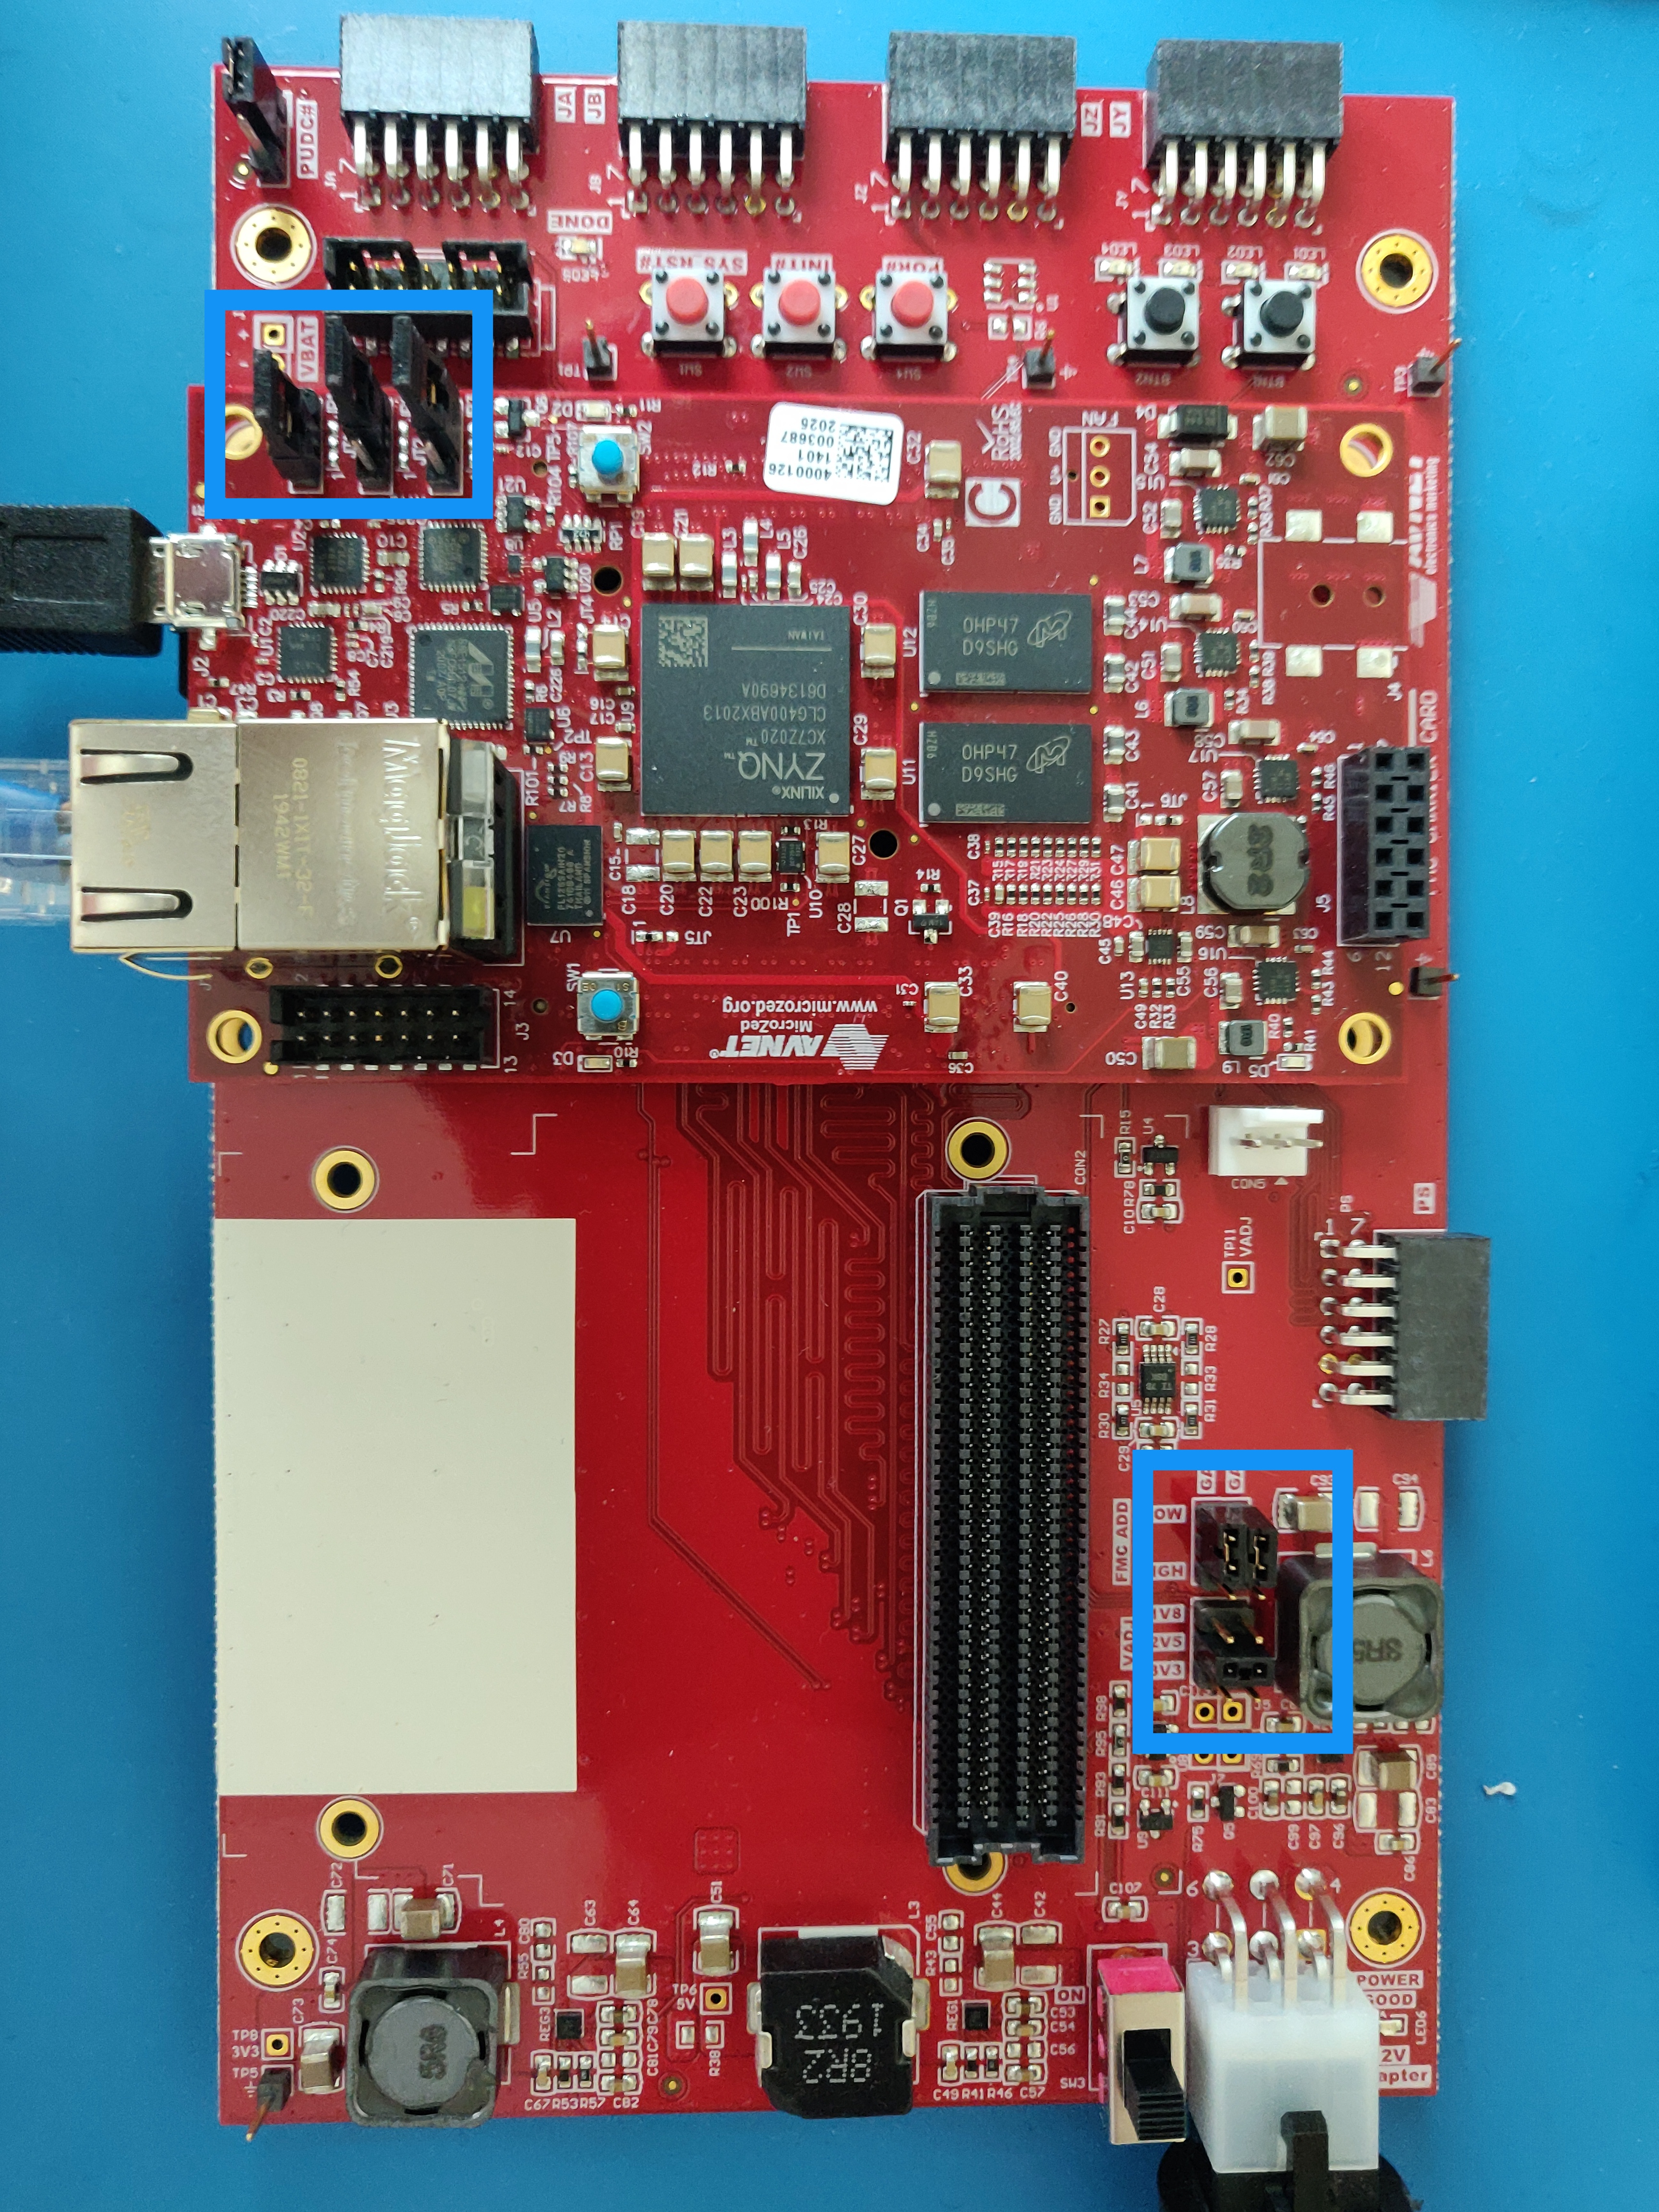
Figure 1: MicroZed System: Top View with SOM and MZCC Jumpers
Perform the steps described in the following sections before applying power to the boards.
Configuring the MicroZed 7Z010 to Boot from an SD Card
By default, the boot mode switches on the MicroZed 7Z010 are set to boot from the Quad Serial Peripheral Interface (QSPI). Set these switches (J1, J2, J3) to the positions shown in Figure 2: so that the 7Z010 will boot from the SD card. See the section “Configuration Modes” in the MicroZed Hardware User Guide for detailed information.
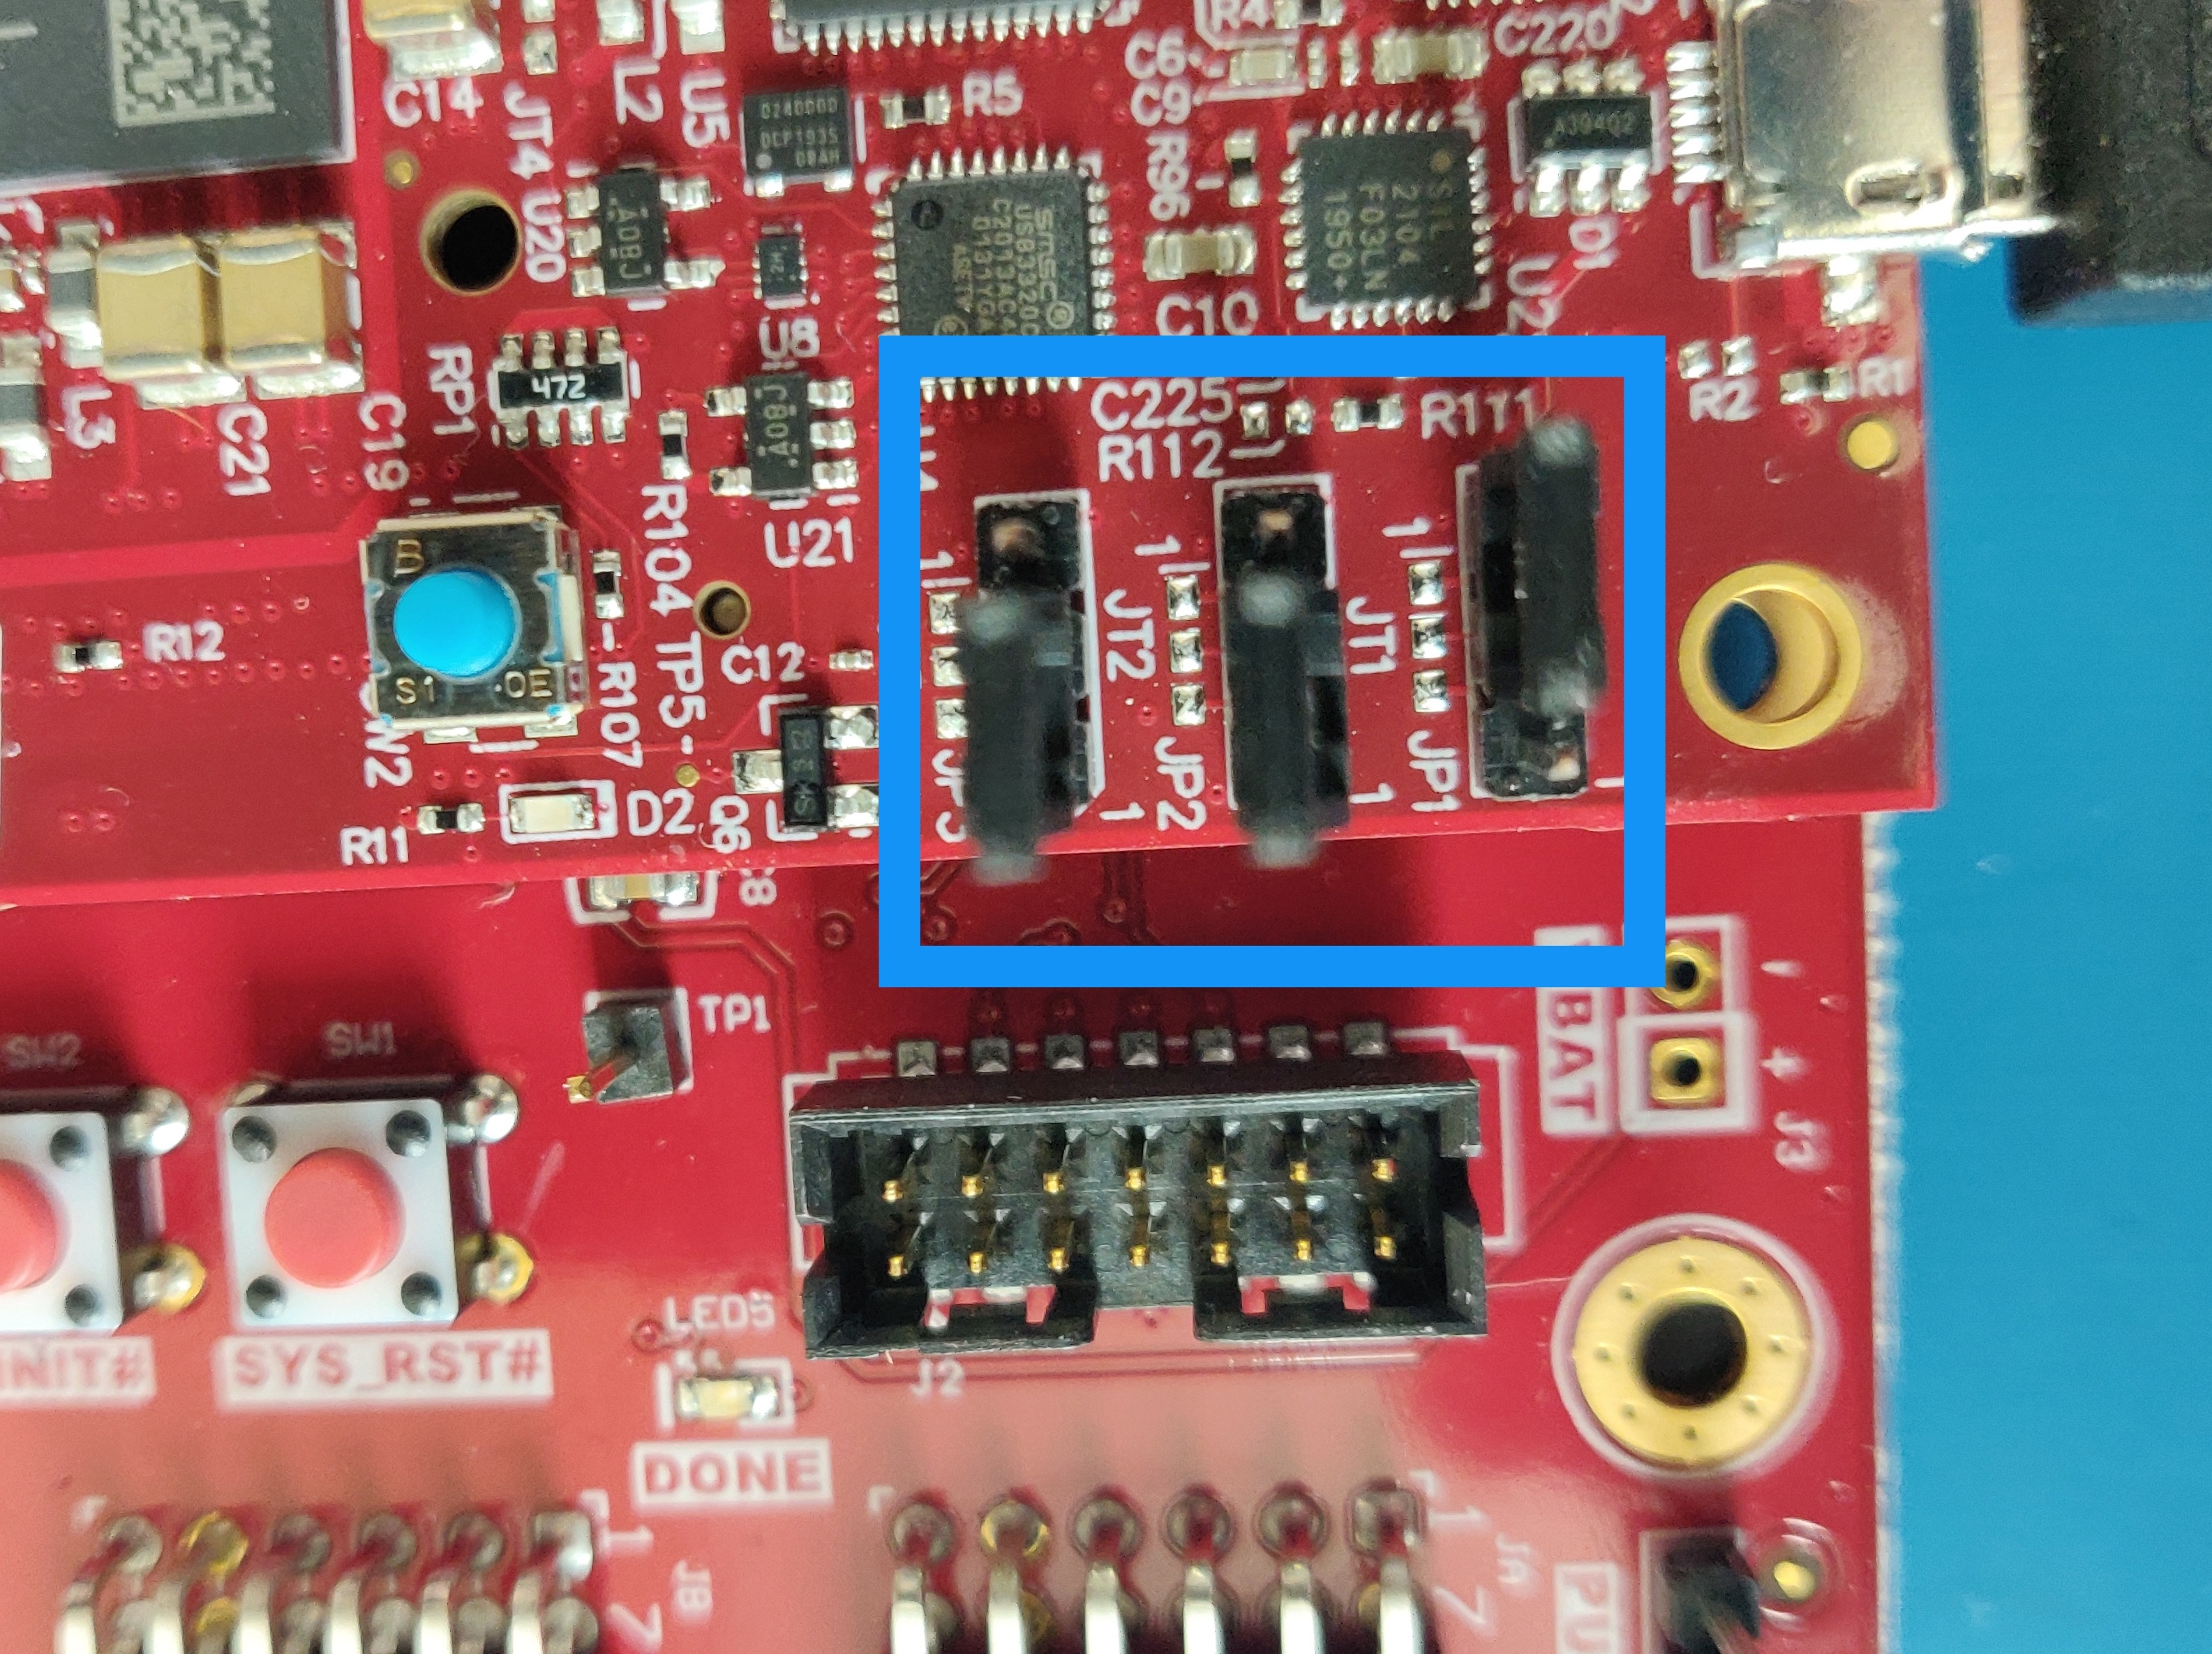
Figure 2: Avnet MicroZed 7Z010: Top View with SD Card Boot Mode Switch Settings
Setting up the MZCC
By default, the VADJ jumper (J6) is set to 1.8V but can be set to 2.5V or 3.3V. Adjust the VADJ jumper to the desired VADJ level as necessary. Figure 3: shows the jumper set to 2.5V. See the section “Jumpers, configuration and test points” in the Avnet MZCC User Guide for details.
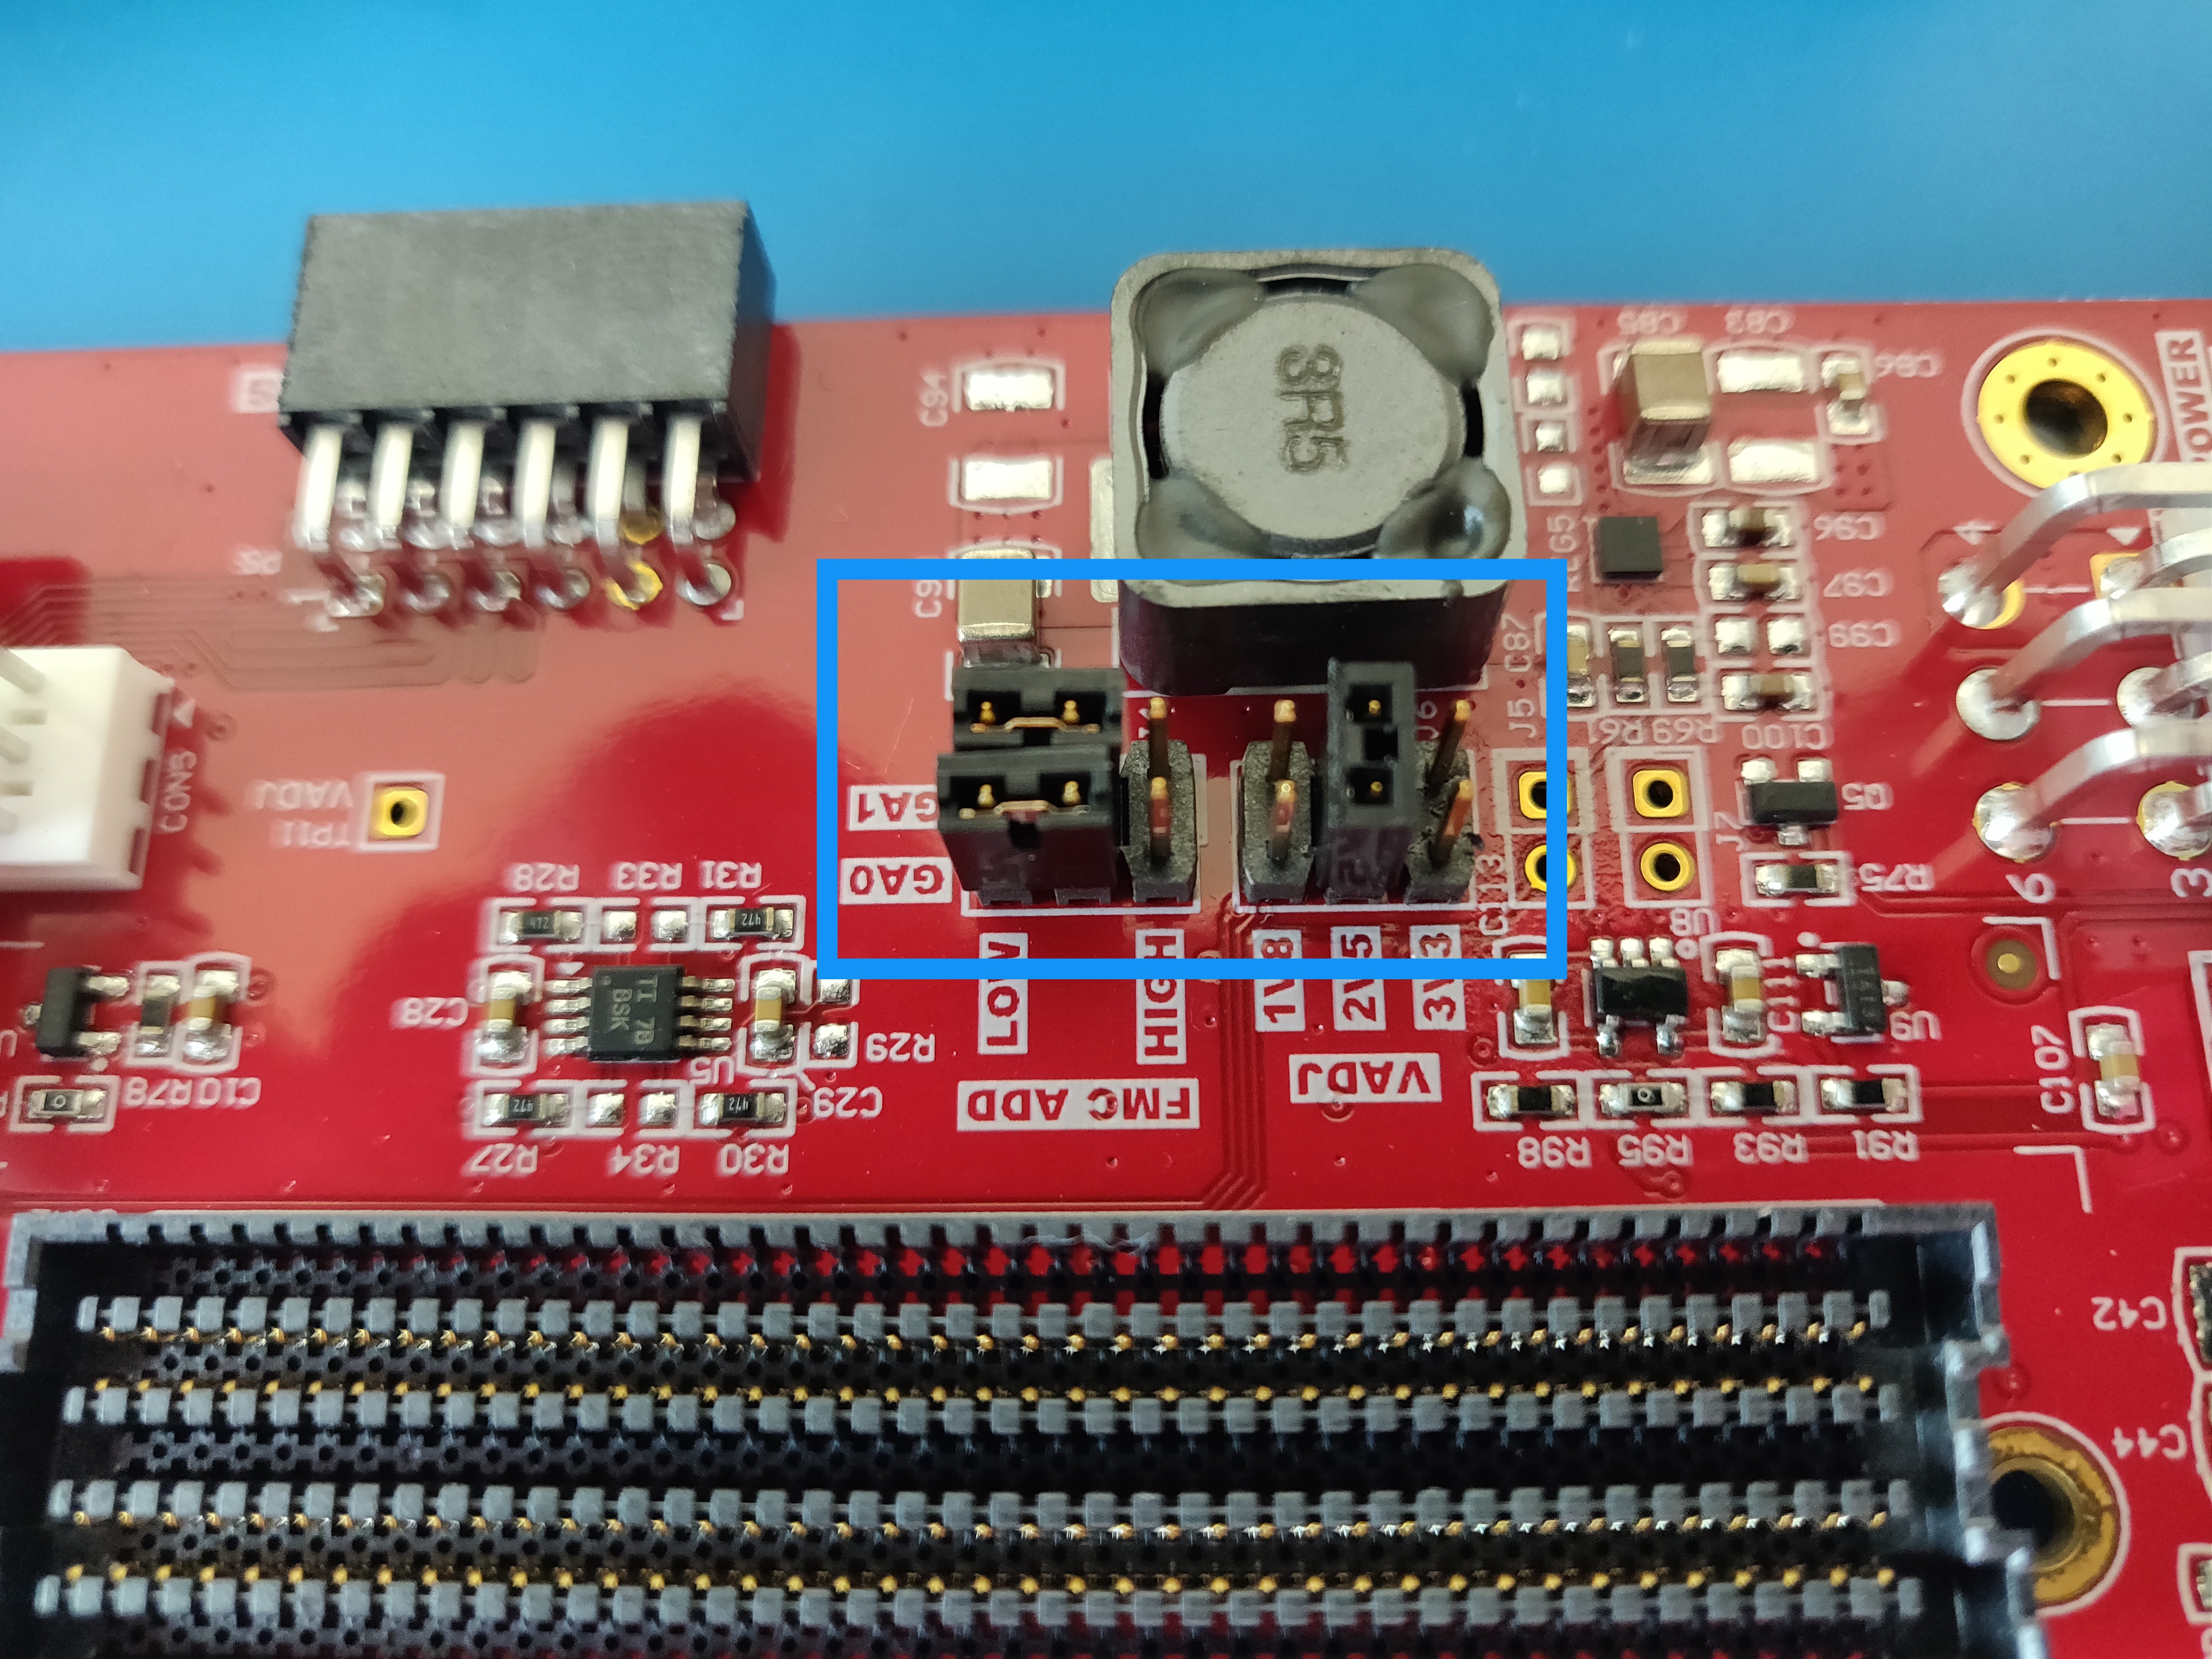
Figure 3: Avnet MZCC: Top View of VADJ Jumper Setting to V2.5 for the FMC LPC
Installing the SOM on the MZCC
In the OpenCPI MicroZed system, the MicroZed SOM gets its power from the MZCC. For the MicroZed SOM to be powered on, it must be installed on the MZCC via the JX1 and JX2 SOM interface MicroHeaders. See the section “JX1 and JX2 MicroZed interface microheaders” in the MZCC User Guide for information about these connectors.
Connecting FMC Daughtercards (Optional)
The MZCC has an FMC LPC slot that can be used to connect plug-in modules or daughtercards, as shown in Figure 4:. OpenCPI currently supports two daughtercards that can be installed on the MZCC:
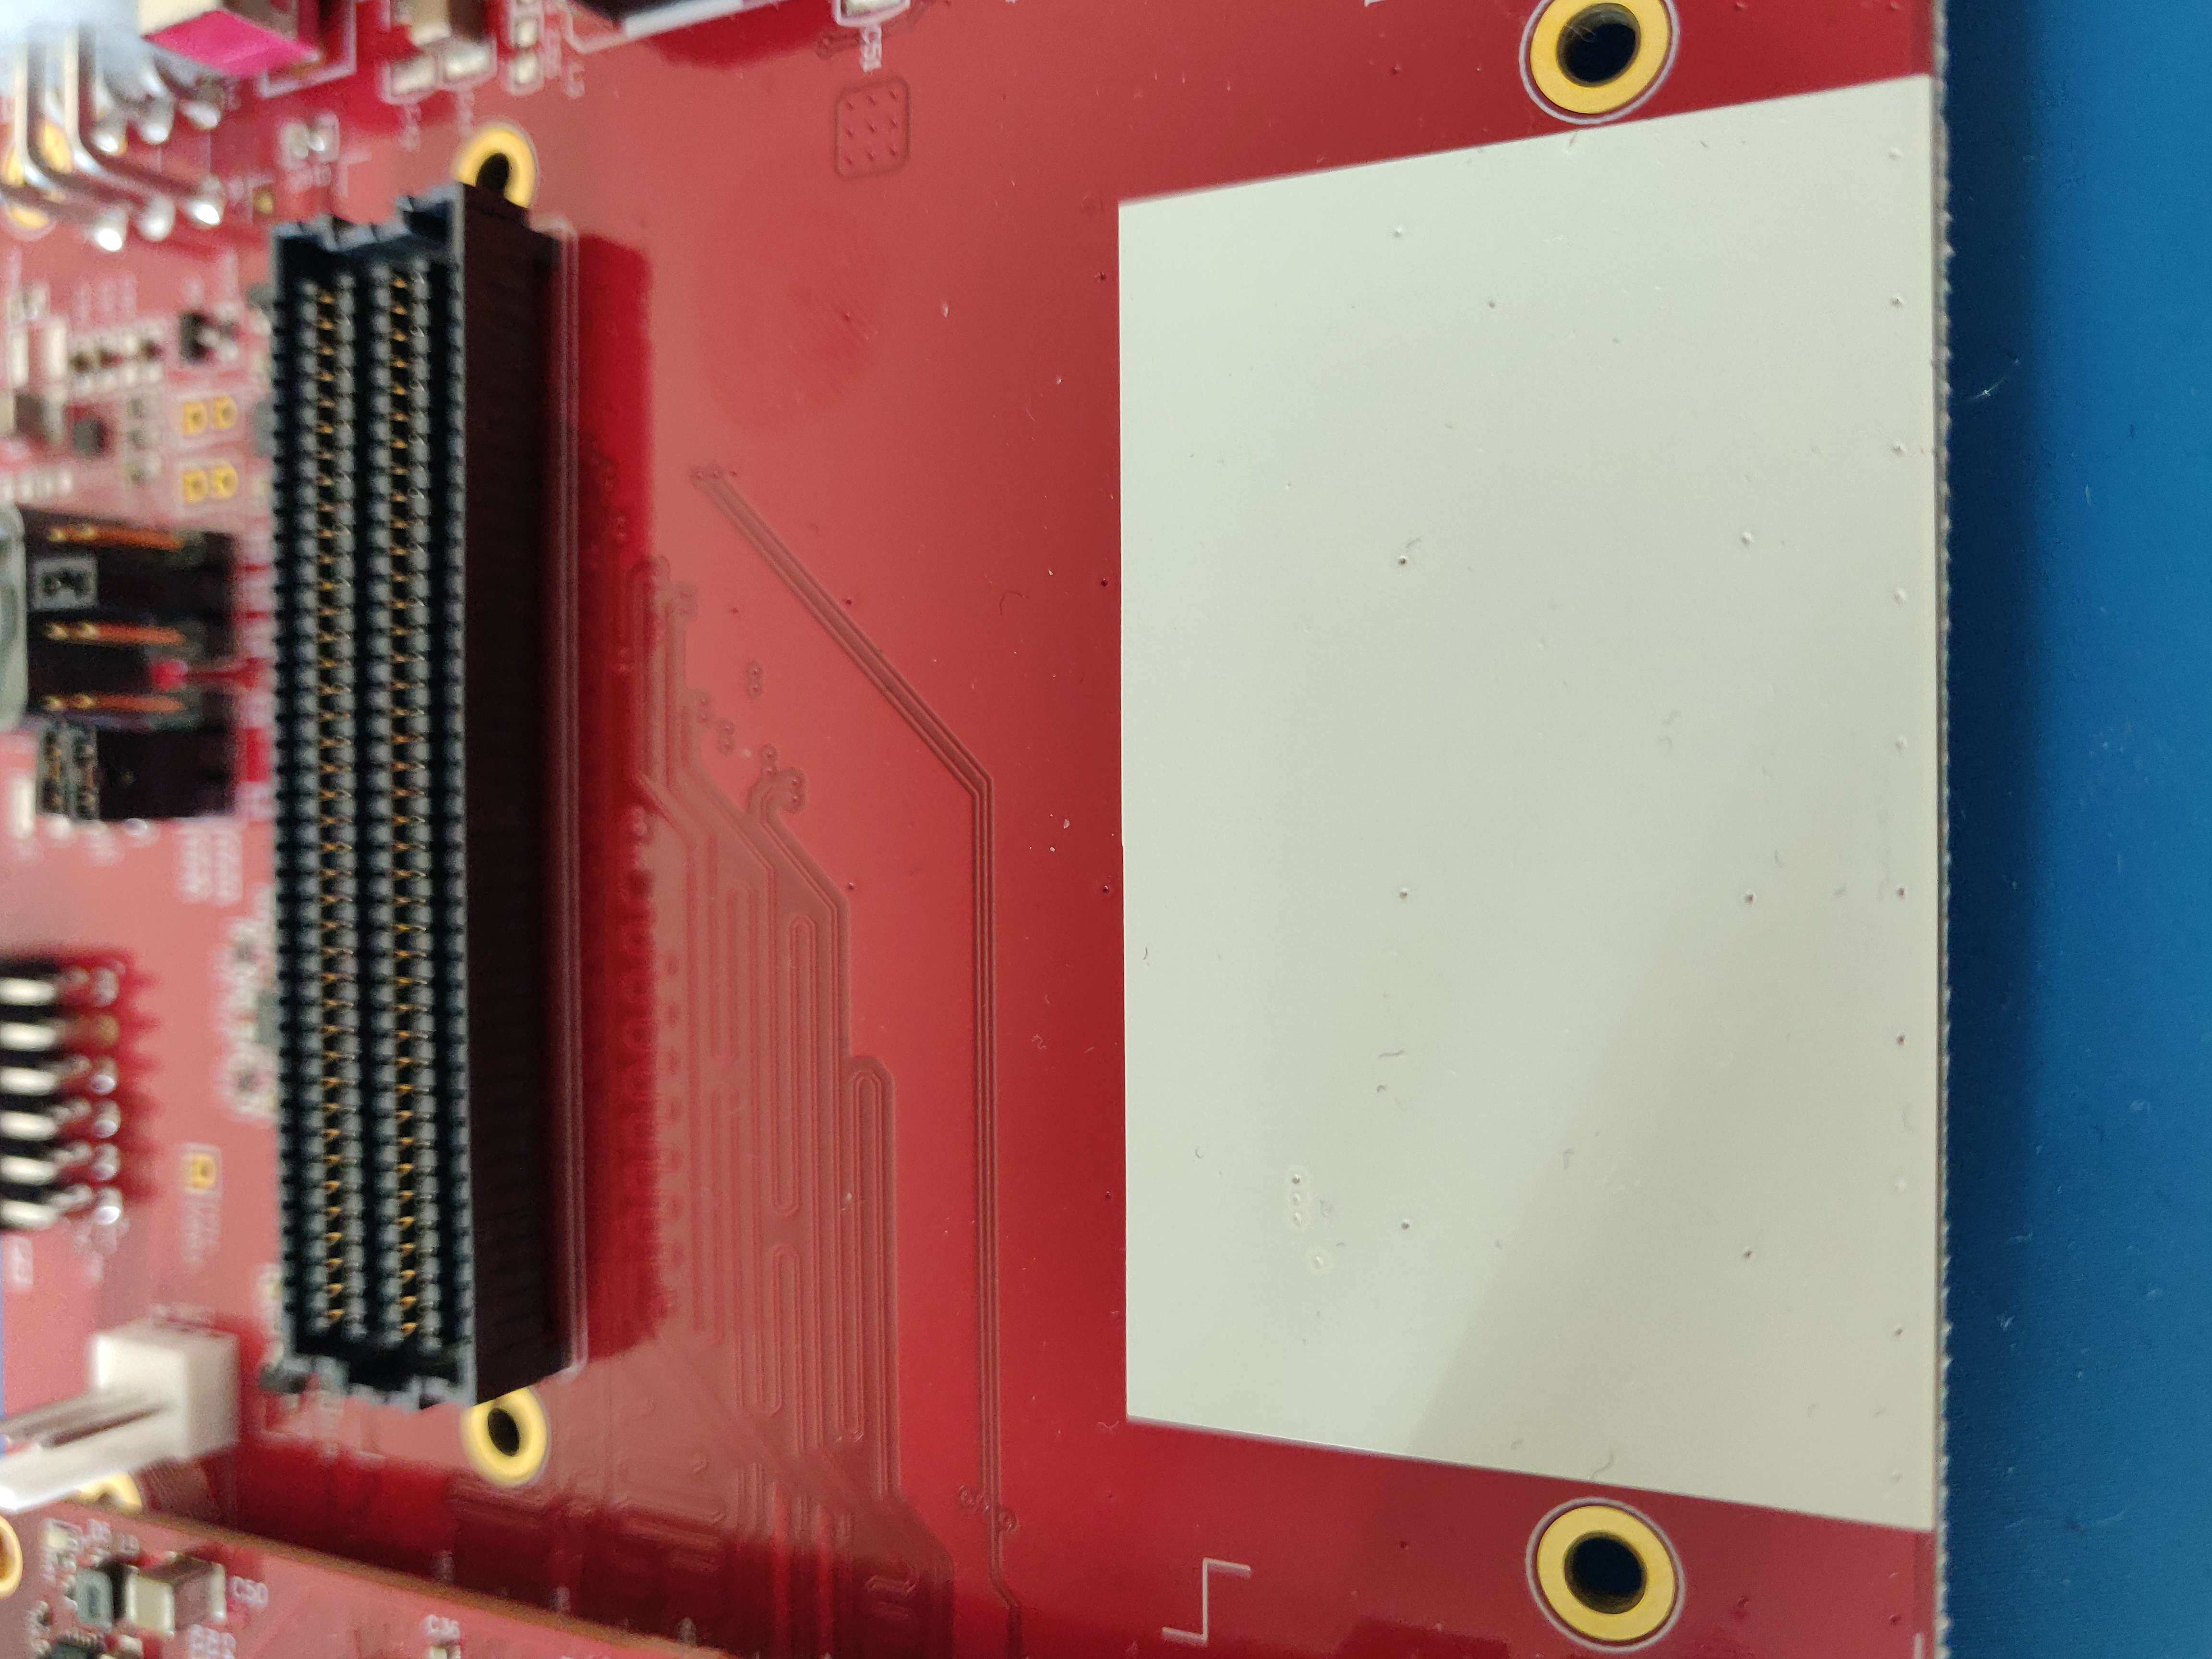
Figure 4: Avnet MZCC: FMC-LPC Slot
Enabling OpenCPI Development for the MicroZed
This section gives information about the MicroZed 7Z010 to use when following the instructions in the chapter “Enabling OpenCPI Development for Embedded Systems” of the OpenCPI Installation Guide.
Note
The instructions in the next sections assume that the basic OpenCPI installation for the development host has already been done. If it hasn’t, follow the instructions in the chapter “Installing OpenCPI on Development Hosts” of the OpenCPI Installation Guide before proceeding to follow the instructions in these sections.
Installation Steps for the MicroZed
This section contains information to be applied to the tasks described in the section “Installation Steps for Platforms” of the OpenCPI Installation Guide.
Supported OpenCPI Platforms and Vendor Tools
Table 2: lists the OpenCPI software (RCC)
and hardware (HDL (FPGA) platforms used for the MicroZed
and the third-party/vendor tools on which they depend.
The OpenCPI HDL platform name for the MicroZed 7Z010 is microzed_10_cc.
OpenCPI Platform Name |
Description |
OpenCPI Project/Repo |
Required Third-Party/ Vendor Tools |
|---|---|---|---|
|
Xilinx® Linux from 2019Q2 (2019.2) for Zynq®-7000 |
built-in |
Xilinx Vitis™ SDK 2019.2 Xilinx Binary Zynq Release 2019.2 Xilinx Linux Xilinx Linux tag: |
|
Avnet MicroZed Zynq-7000 FPGA/PL |
|
Xilinx Vivado® WebPACK |
Notes about the OpenCPI platforms listed in the table:
xilinx19_2_aarch32is the primary RCC platform for the MicroZed.The
xilinx19_2_aarch32RCC platform is configured for DHCP.
Installing the Vendor Tools for the OpenCPI Platforms
Follow the instructions in the section “Installing Xilinx Tools” in the chapter “Installing Third-party/Vendor Tools” in the OpenCPI Installation Guide to install the Xilinx tools listed as platform dependencies in Table 2:.
Note
Perform this step first, before installing/building the OpenCPI platforms for the MicroZed.
Note
The MicroZed system requires the Xilinx Binary Zynq Release 2019.2 (see Supported OpenCPI Platforms for the MicroZed 7Z010 and their Dependencies).
As a convenience, the OpenCPI Avnet OSP provides this package for the MicroZed 7Z010 in
the location <path-to-avnet-osp>/hdl/platform/microzed_10_cc/2019.2-microzed_10_cc-release.tar.xz.
This package can be placed in the /tools/Xilinx/ZynqReleases/2019.2/ (or /opt/Xilinx/ZynqReleases/2019.2/)
directory instead of downloading it from the Xilinx website as described in the
section “Xilinx Binary Releases for Zynq-7000 and Zynq-Ultrascale Systems” in the OpenCPI Installation Guide.
Installing and Building the OpenCPI Platforms for the MicroZed
After installing the required vendor tools, follow the instructions
in the section “Installation Steps for Platforms” in the
OpenCPI Installation Guide
to install and build the xilinx19_2_aarch32 and microzed_10_cc platforms for the MicroZed system.
Both these platforms must be installed and built with ocpiadmin install platform
before proceeding to set up the SD card for the MicroZed. For example:
ocpiadmin install platform xilinx19_2_aarch32

ocpiadmin --package-id=ocpi.osp.avnet install platform microzed_10_cc
Note
Specifying the --package-id option directs the command to download and build the OSP.
See the ocpiadmin(1) man page for command usage details.
Note
The xilinx19_2_aarch32 platform is also used by other systems, such as the
Avnet (Digilent) ZedBoard (in OpenCPI, the zed and zed_ise HDL platforms).
If the xilinx19_2_aarch32 platform has already been installed and built
for another supported system, it can apply to the MicroZed and does not need to be installed and built.
Installation Steps for the MicroZed After Its Platforms Have Been Installed
This section contains information to be applied to the tasks described in the section “Installation Steps for Embedded Systems After Their Platforms Have Been Installed” in the OpenCPI Installation Guide.
Connecting the MicroZed to a DHCP-Supported Network (Optional)
OpenCPI allows three modes of operation on embedded systems: server mode, network mode, and standalone mode (see the beginning paragraphs in the section “Installation Steps for Systems after their Platforms are Installed” of the OpenCPI Installation Guide for details).
Using server mode or network mode for OpenCPI on the MicroZed embedded system requires establishing an Ethernet connection from the MZCC to a network that supports DHCP.
There is one Ethernet port located on the MZCC, as shown in Figure 5:. Use a 1-Gigabit Ethernet cable to connect this port to the DHCP-supported network.
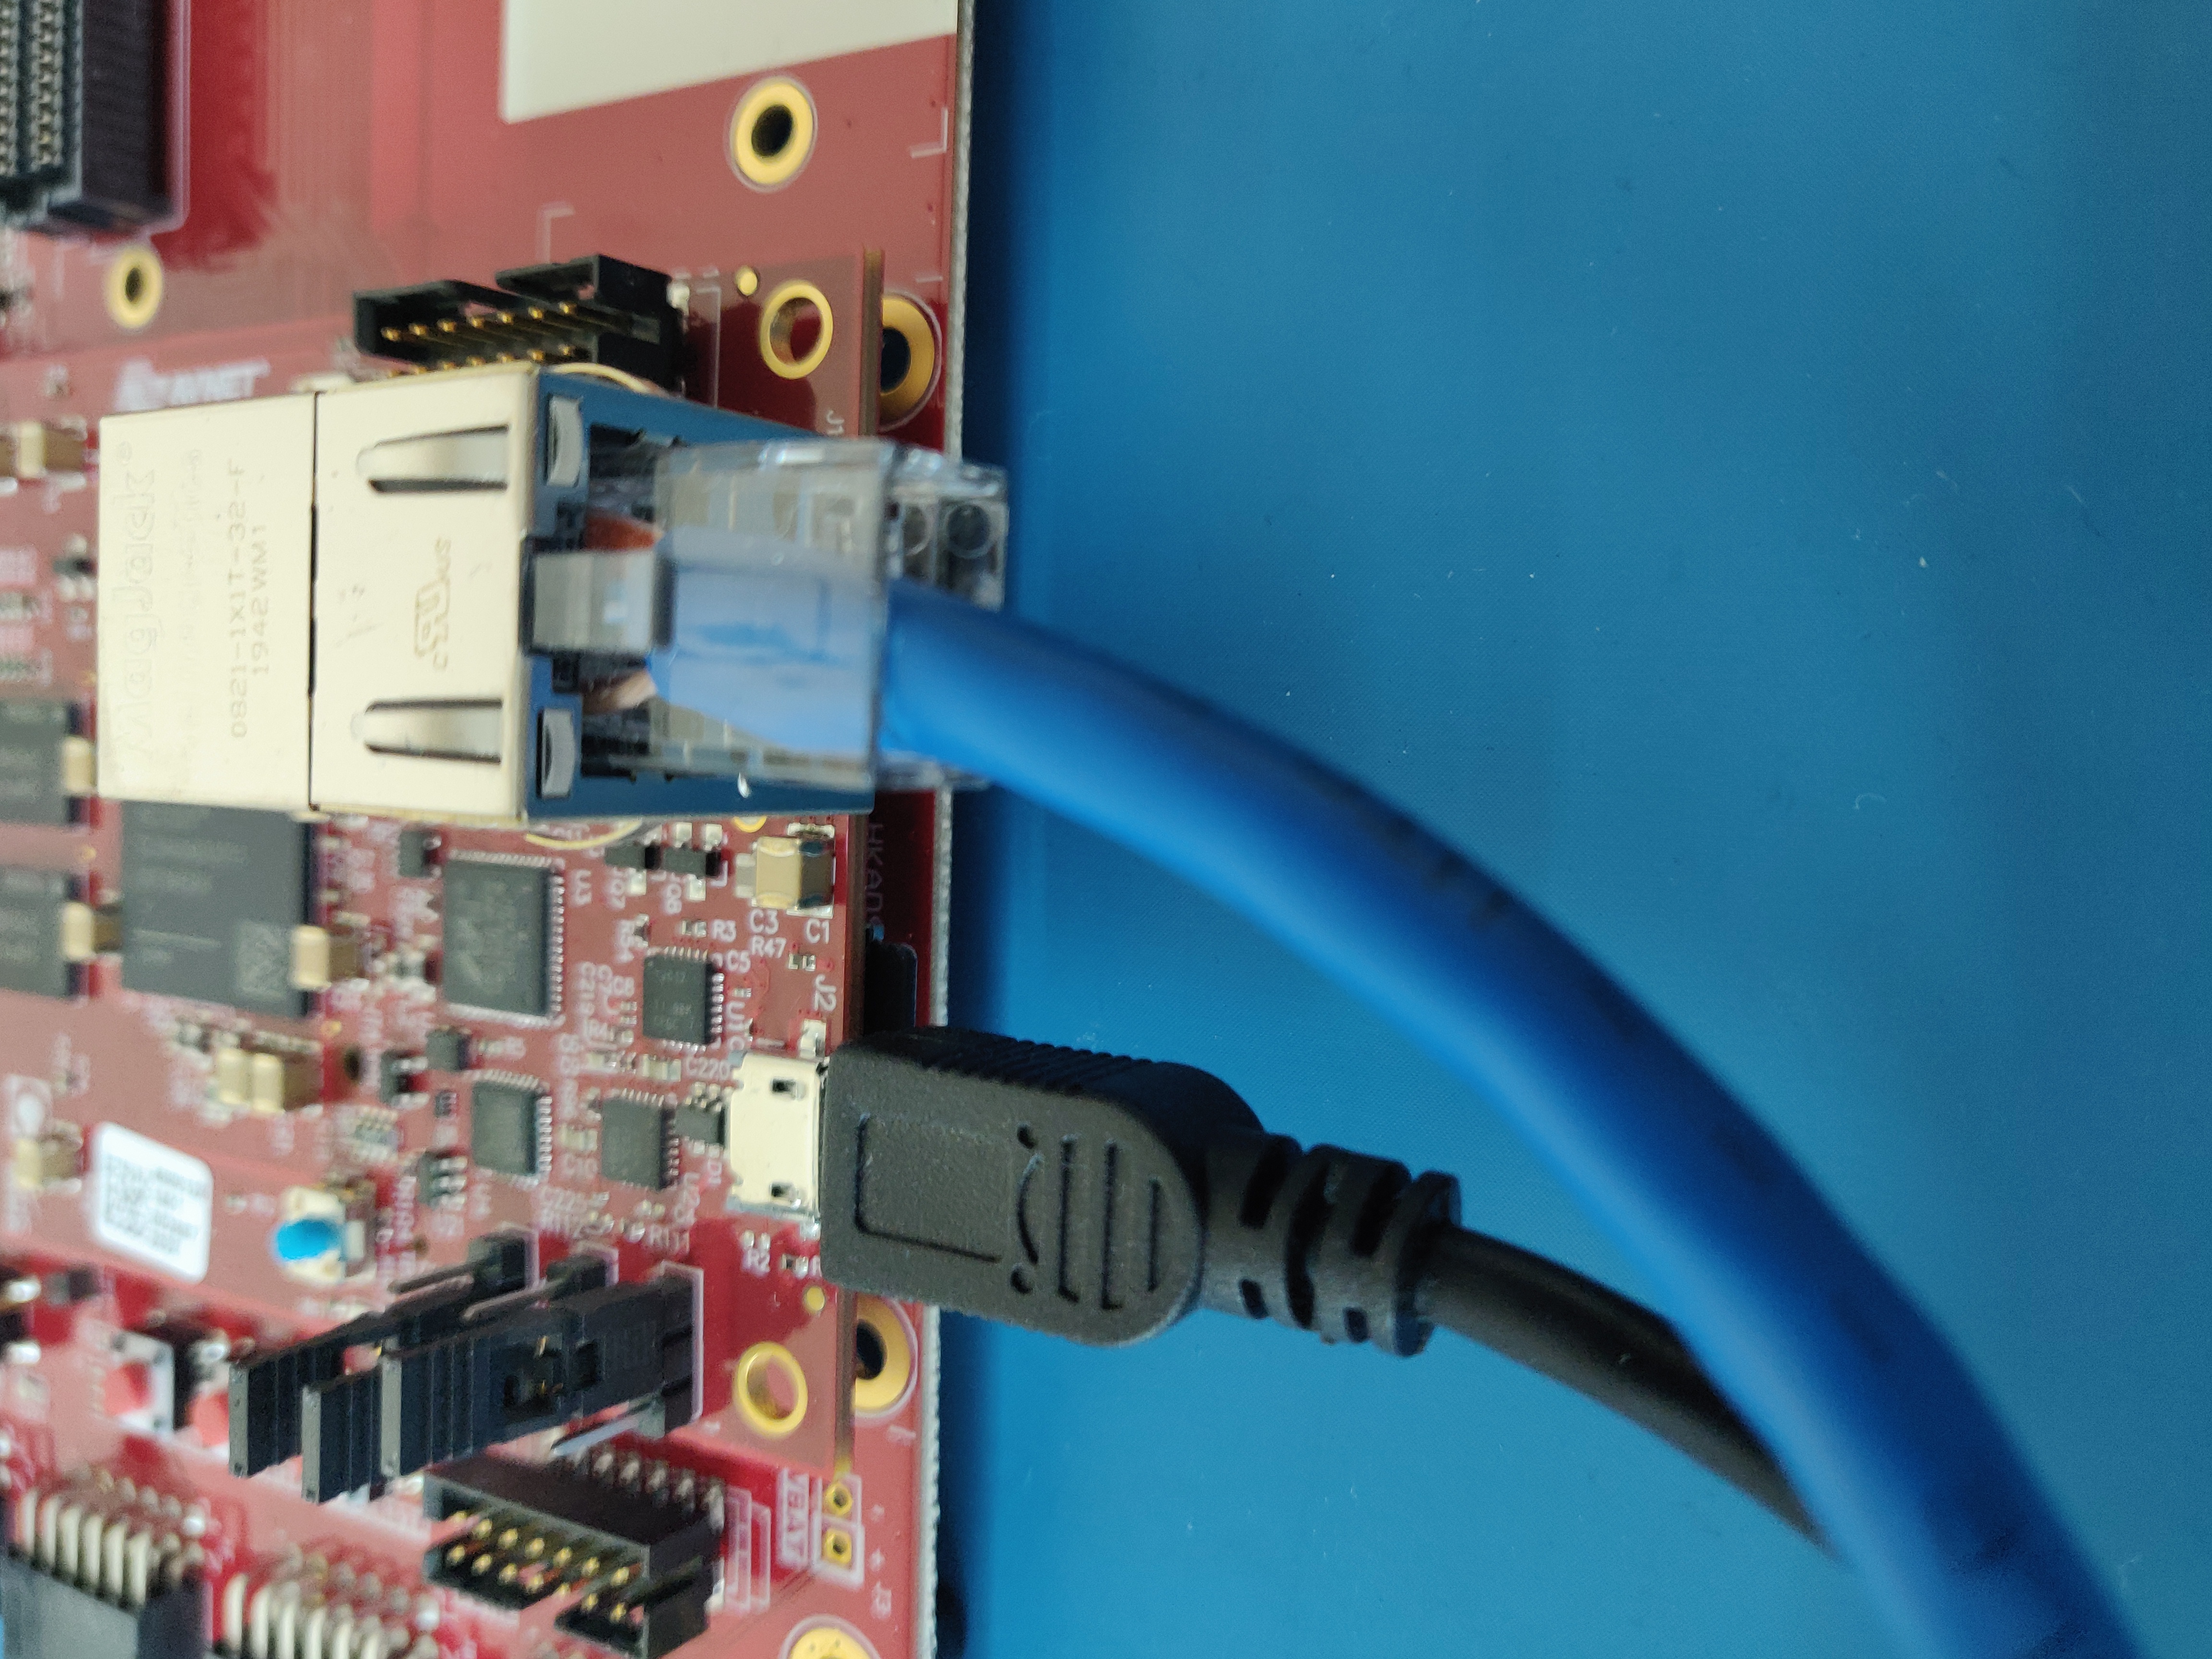
Figure 5: Avnet MZCC: Ethernet Port
Setting up the SD Card for the MicroZed
Note
The process of creating a bootable SD card for the MicroZed system requires an SD card reader/writer to be connected to the development host. If you have not done so already, follow the instructions in the section “Using SD Card Reader/Writer Devices” of the OpenCPI Installation Guide to set up an SD card reader/writer before proceeding with this section.
The MicroZed boots from an SD card. Enabling OpenCPI on the MicroZed requires creating a bootable SD card that replaces the factory SD card supplied with the MZCC kit.
Follow the instructions in the subsections “Preparing the SD Card Contents”, “Writing the SD Card” and “SD Card OpenCPI Startup Script Setup” in the section “Installation Steps for Systems After Their Platforms are Installed” of the OpenCPI Installation Guide to create a bootable SD card that enables the MicroZed for OpenCPI.
Note
The recommended method described in the OpenCPI Installation Guide applies to the MicroZed: make a raw copy of the factory-provided card to a new card, remove the factory-provided content (files and directories) from the raw copy, and then copy the OpenCPI-provided content to the raw copy. OpenCPI provides all of the necessary files for installation and deployment on the MicroZed.
Should you need to format an SD card for the MicroZed, it should be a single FAT32 partition.
The bootable SD card slot is located on the top side of the MZCC underneath the micro-USB serial console port, as shown in Figure 6:.
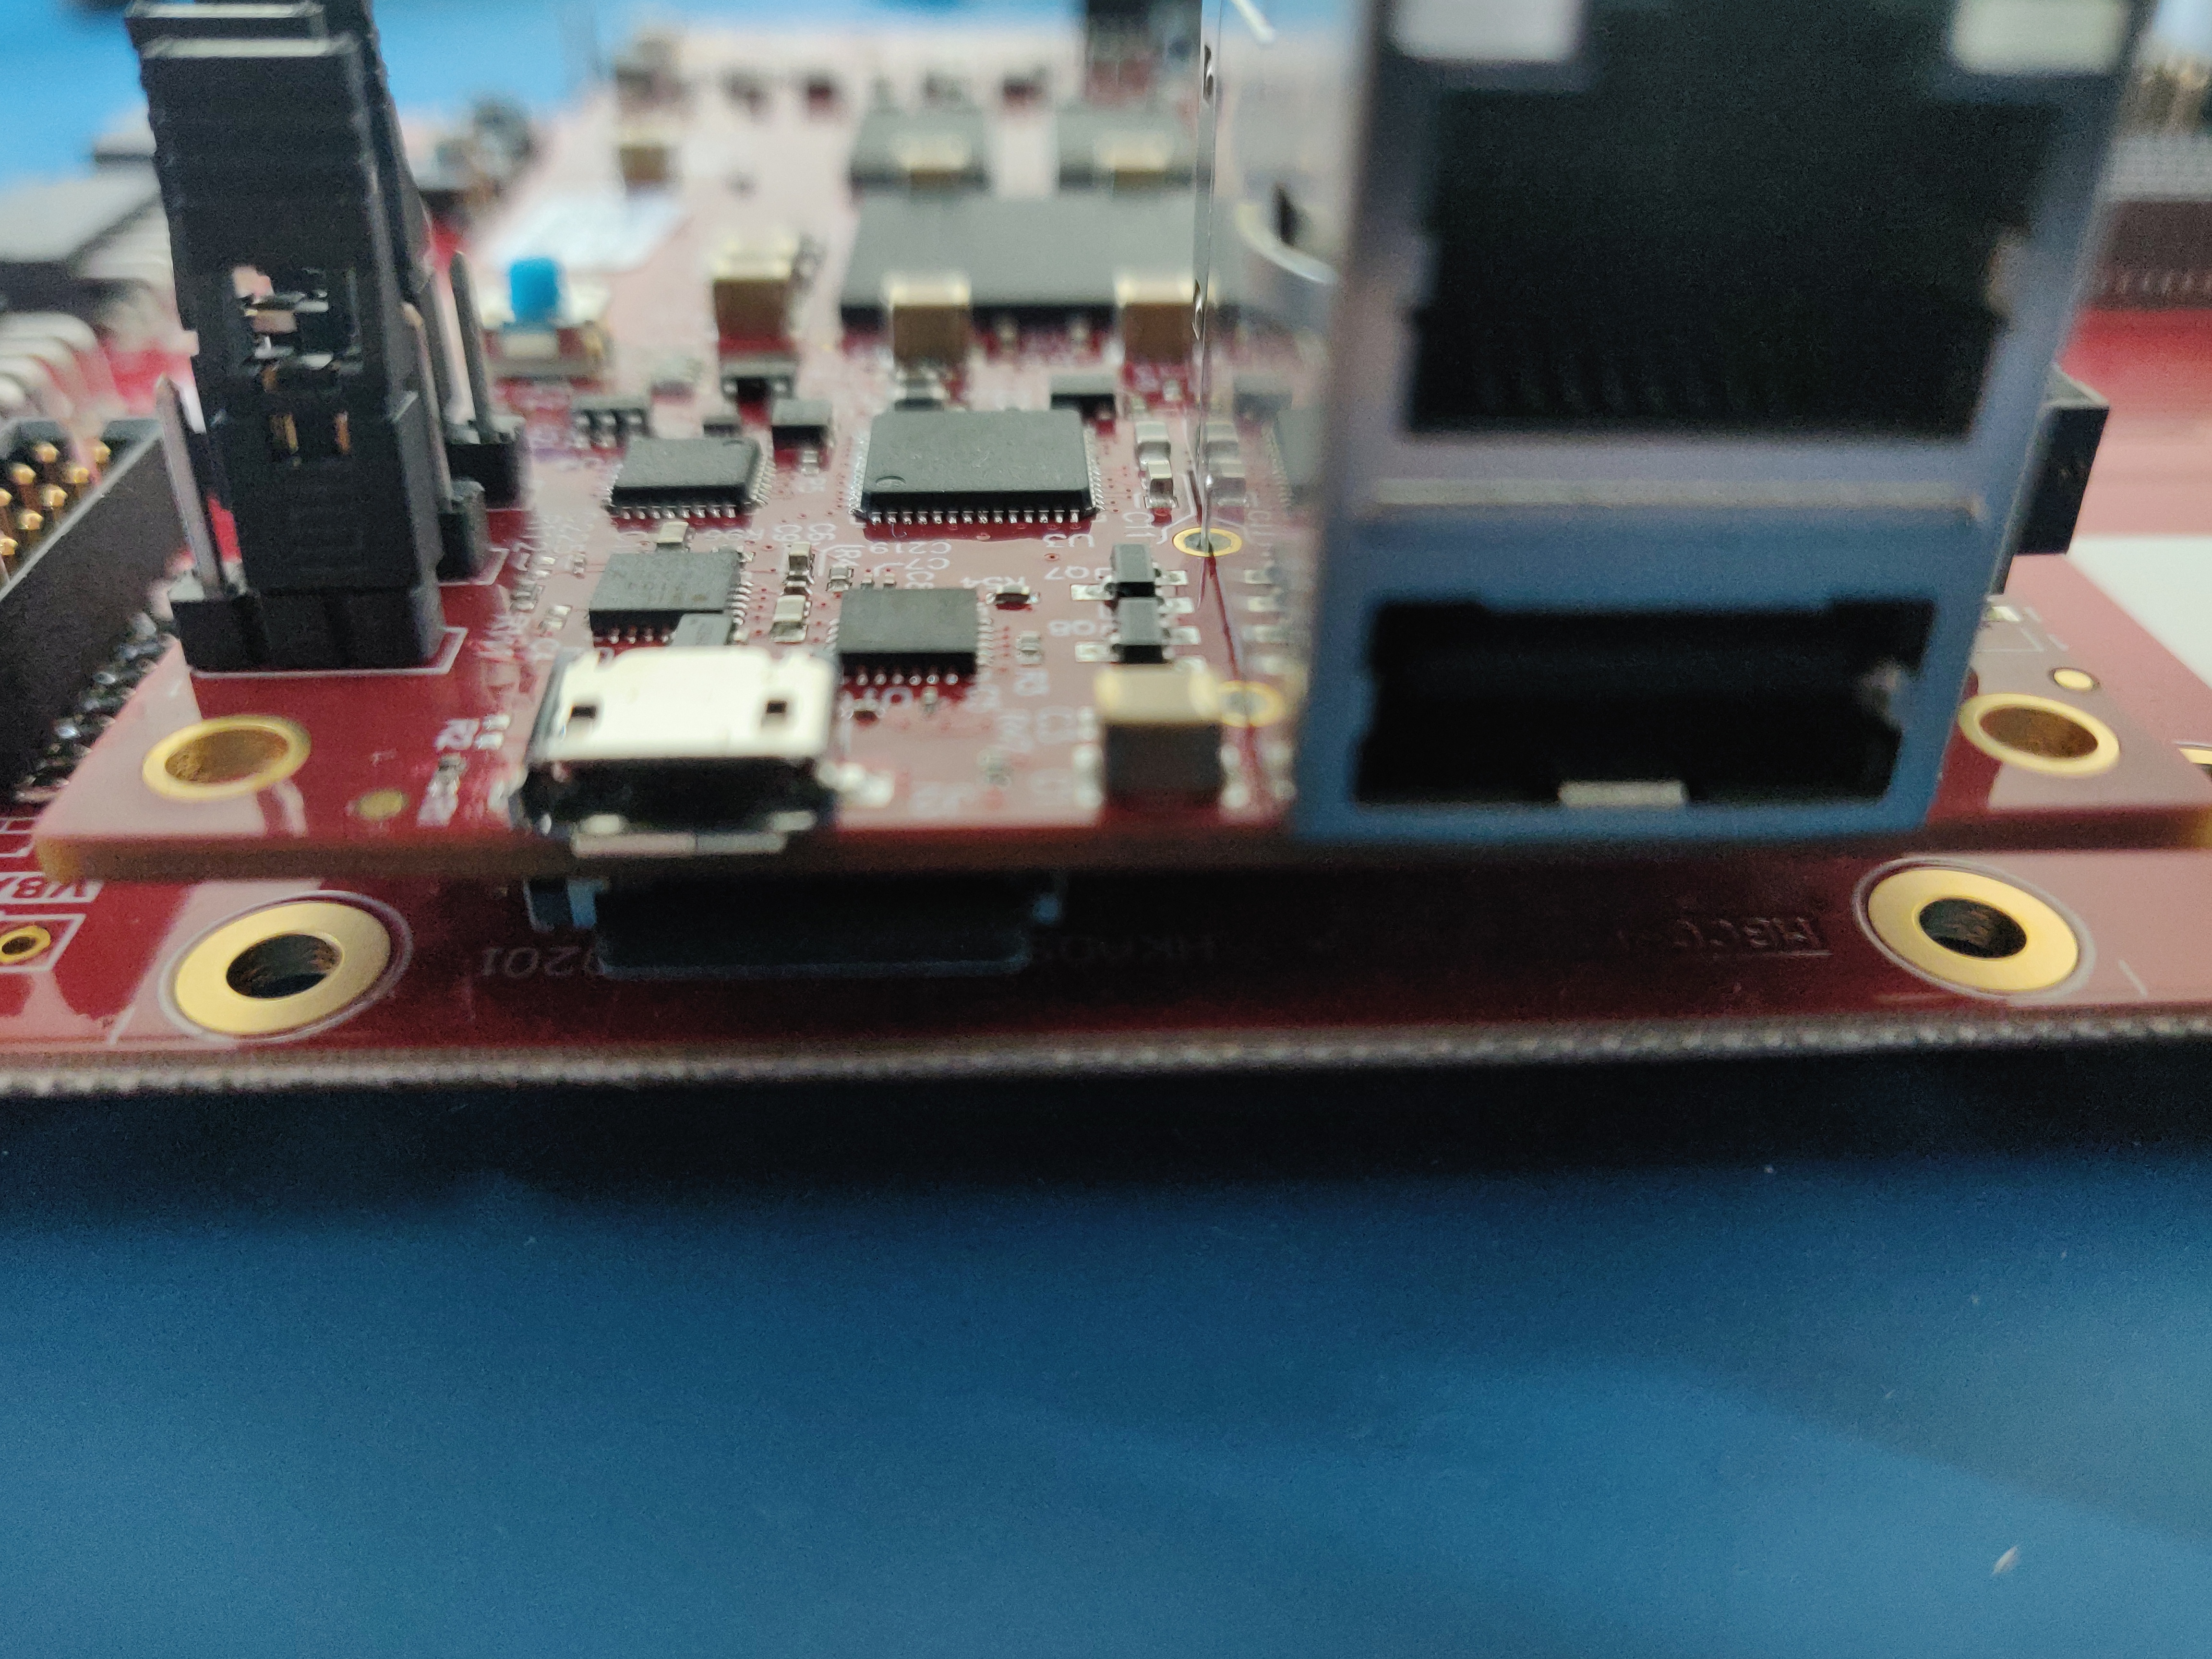
Figure 6: Avnet MZCC: Serial Console Port and microSD Card
Once you have finished with this procedure, eject the SD card from the card reader/writer on the development host and insert it into the MZCC SD card slot while the MZCC is powered off.
To eject an SD card, gently push it in and then release it.
Establishing a Serial Console Connection for the MicroZed
Follow the instructions in the section “Establishing a Serial Console Connection” in the OpenCPI Installation Guide to set up a serial console connection between the MicroZed and the development host.
On the MicroZed system, the micro-USB serial port is located on the top side of the MZCC above the microSD card slot (see Figure 6:) and is labeled UART. Connect the micro-USB to USB-A cable from this port to the development host.
The MicroZed’s serial USB port operates at 115200 baud.
Configuring the Runtime Environment on the MicroZed
Follow the instructions in the section “Configuring the Runtime Environment on the Embedded System” in the OpenCPI Installation Guide to verify the runtime environment on the MicroZed embedded system before running any applications.
To boot the MicroZed:
Ensure that:
The MicroZed SOM and MZCC boards are configured for OpenCPI, as described in Setting up the MicroZed Hardware.
The MicroZed MZCC and the development host are connected by a serial console cable, as described in Avnet MZCC: Serial Console Port and microSD Card.
Insert the prepared SD card into the SD card slot on the MZCC, as shown in Figure 6:.
Start a terminal emulator on the development host (usually with the
screencommand) at 115200 baud.Apply power to the MZCC.
After Linux boots successfully, log in using
rootfor user name and password (note that the password must be supplied twice when using server mode or network mode).
Note
Boot problems have been observed on MicroZed REV F boards. The following command may need
to be issued at the Zynq> prompt to get the boot sequence to succeed:
setenv default_bootcmd run uenvboot; run cp_kernel12ram && bootm ${netstart}
Boot problems have not been observed on MicroZed REV G boards. REV numbers can be found underneath the MicroZed SOM nearest the Pmod connector and are incorporated within the copper PCB, as shown in Figure 7:.
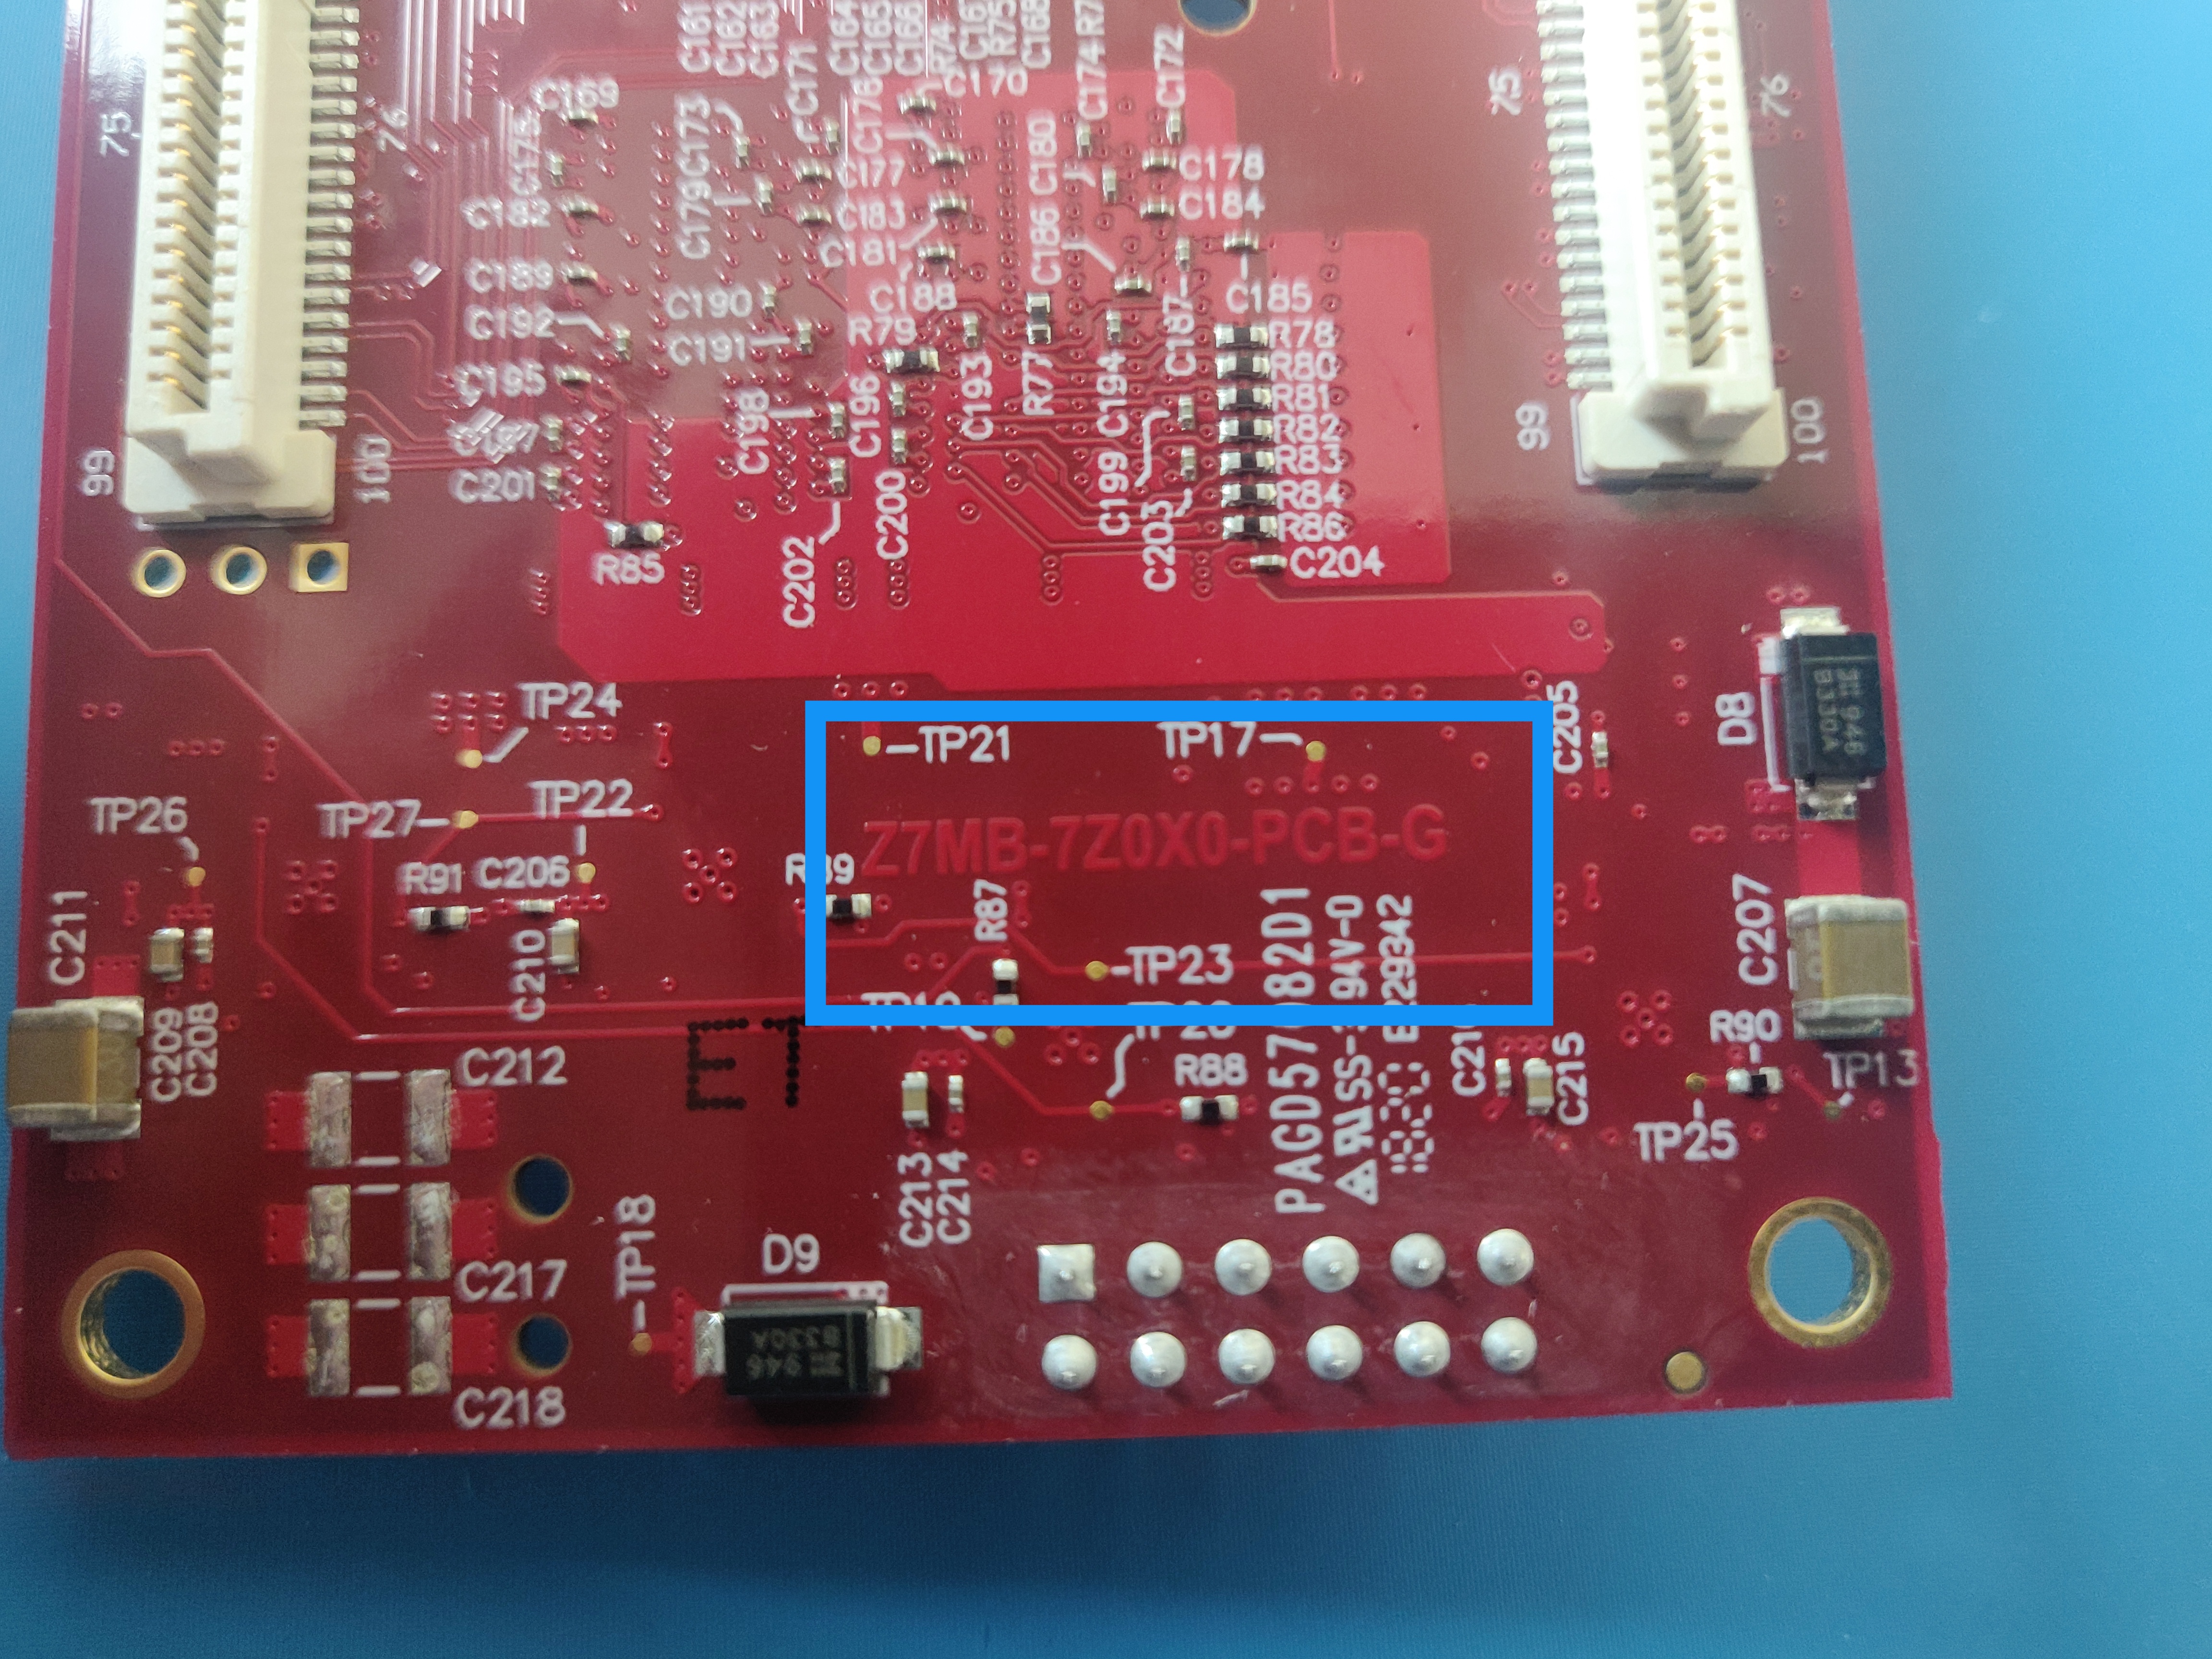
Figure 7: MicroZed SOM REV G Number (shown on MicroZed 7020)
After a successful login, follow the mode-specific instructions in the section to establish the OpenCPI environment. This step applies to network mode and standalone mode only. Server mode does not require the use of a setup script.
Running the Test Application on the MicroZed
The steps to build the platforms performed in Installing and Building the OpenCPI Platforms for the MicroZed result in a single executable FPGA
test application named bias that is ready to run. The bias test application is based on the
testbias HDL assembly. Both bias and testbias reside in the ocpi.assets built-in project
at applications/bias.xml and hdl/assemblies/testbias/ respectively.
Follow the steps in the section “Running the Test Application” in the OpenCPI Installation Guide that corresponds to the configured operation mode (server mode, network mode, or standalone mode) to run this application to verify the installation and any HDL assemblies of the Avnet OSP itself.